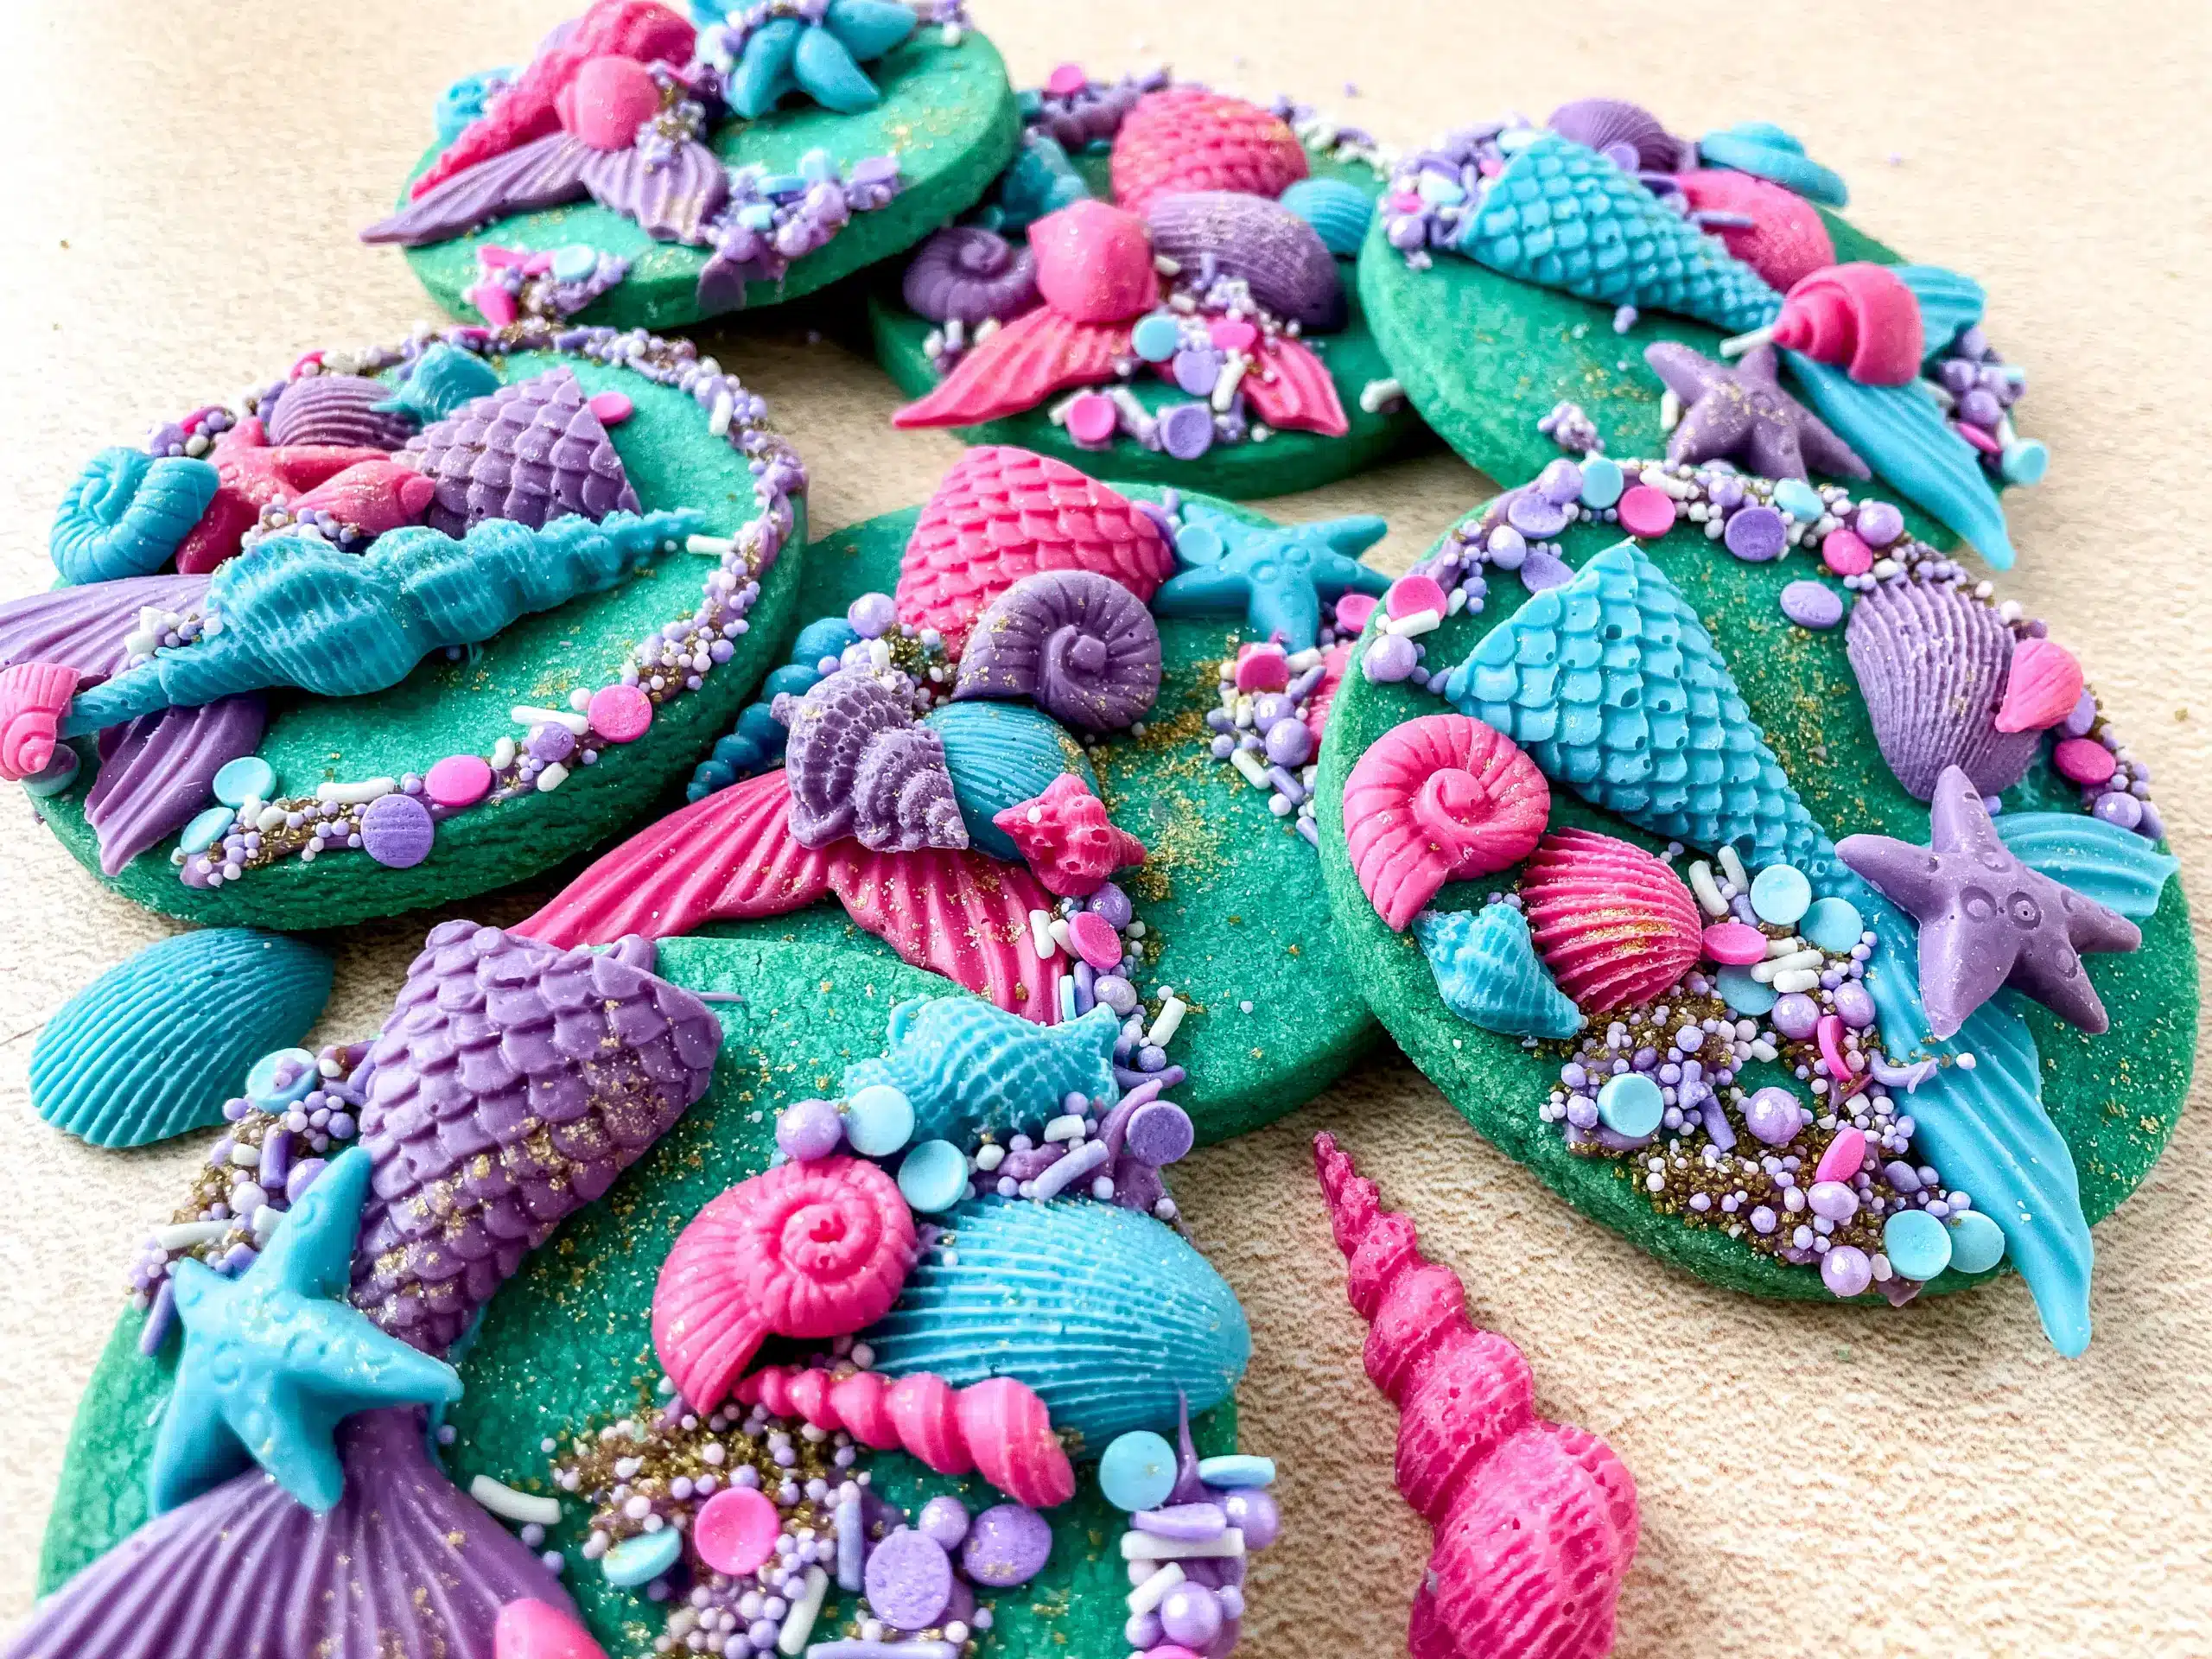
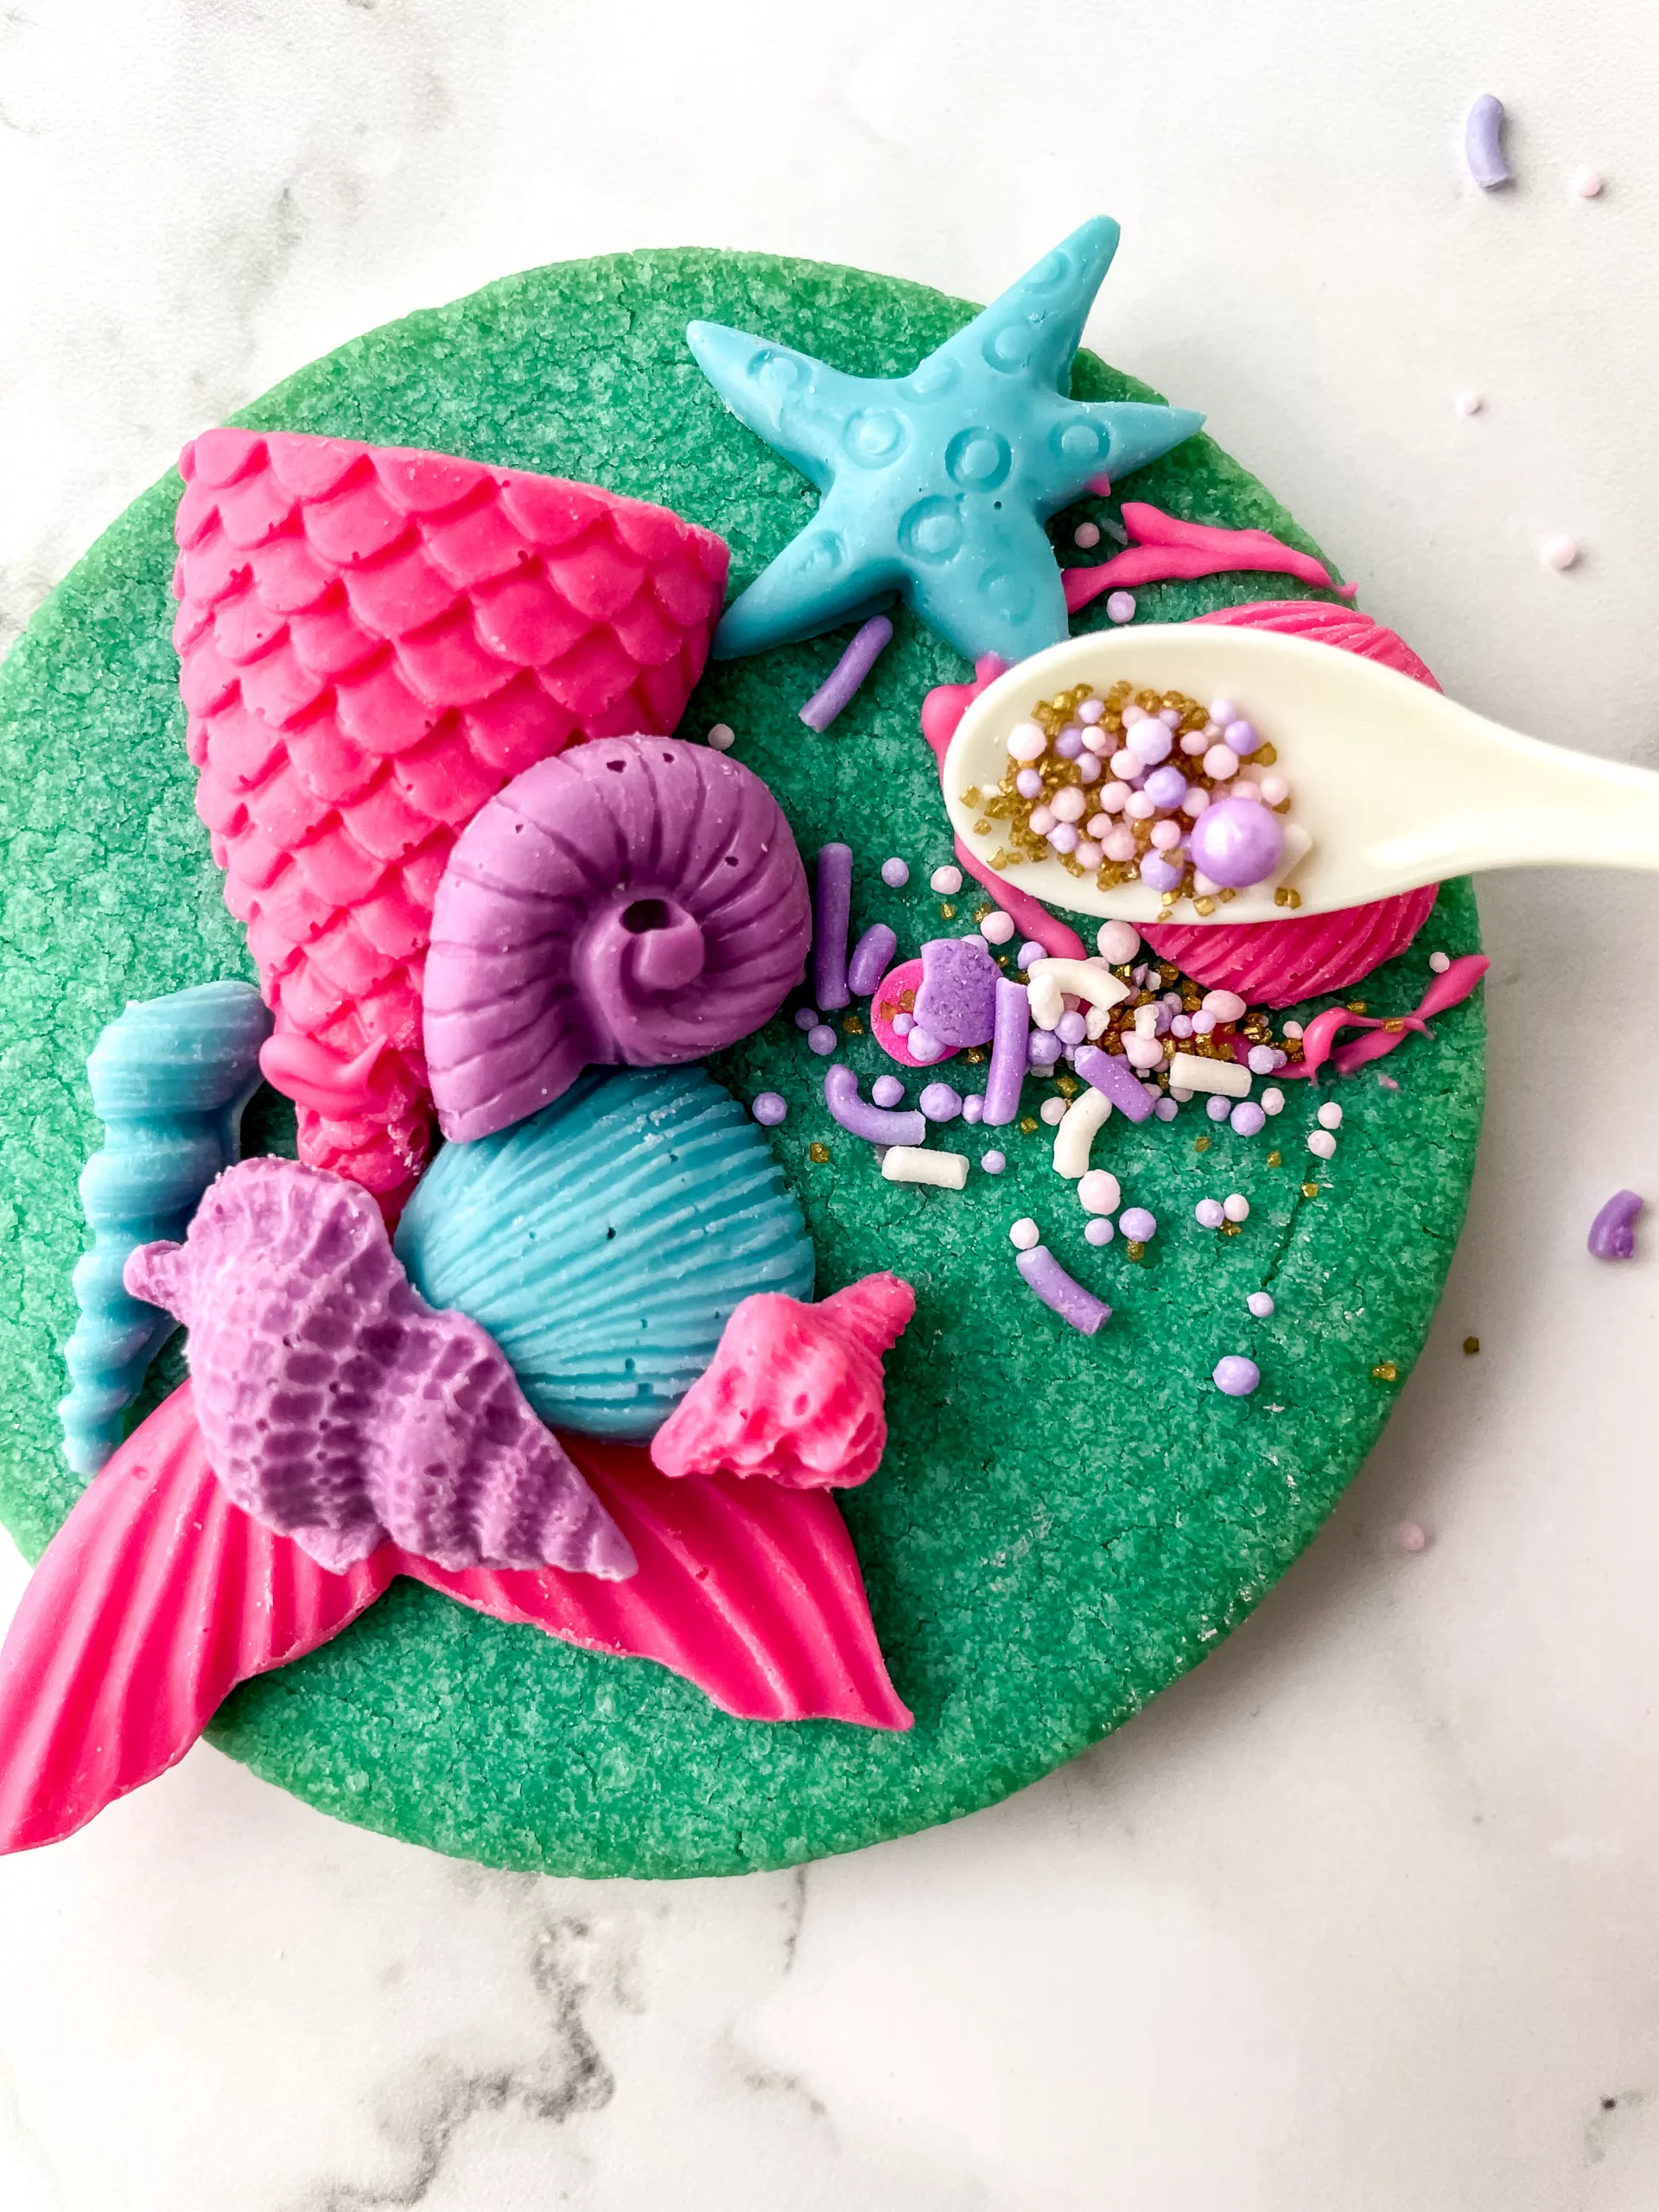
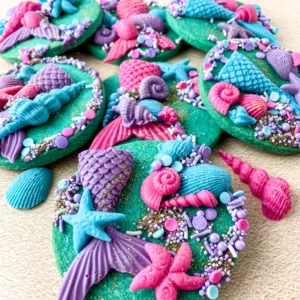
Indulge in the enchanting world of mermaids with these delightful Mermaid Cookies! With the New Little Mermaid movie here, why not make some easy beautiful mermaid cookies for all mermaid celebrations to come. This eggless recipe is perfect for those who love to explore new flavors and enjoy baking. These cookies are not only delicious but also visually stunning, with colorful chocolate mermaid pieces and a sprinkle of edible glitter. Get ready to dive into the magic of these homemade treats!
With their captivating appearance and delightful taste, these Mermaid Cookies are sure to impress both kids and adults alike. The combination of soft blue cookies, colorful chocolate mermaid pieces, and shimmering sprinkles creates a treat that is as visually stunning as it is delicious. So dive into the magical world of mermaids and enjoy these whimsical cookies that are bound to make your taste buds swim with joy!

Delicious and Whimsical Mermaid Cookies (Eggless Recipe)
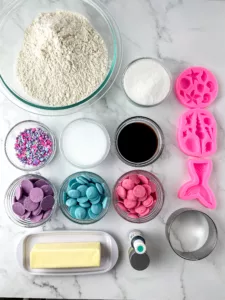
Before we get started, make sure you have the following equipment ready:
The items that are links take you directly to the place you can purchase them.
-Measuring Cups
-Measuring Spoons
-Large Bowl
-Hand or Stand Mixer
-Parchment Paper
-Rolling Pin
-Circle Cutter
-Offset Spatula
-Cookie Baking Sheet
-Mermaid Molds
–Piping Bags
–Scissors
But what about the Ingredients?
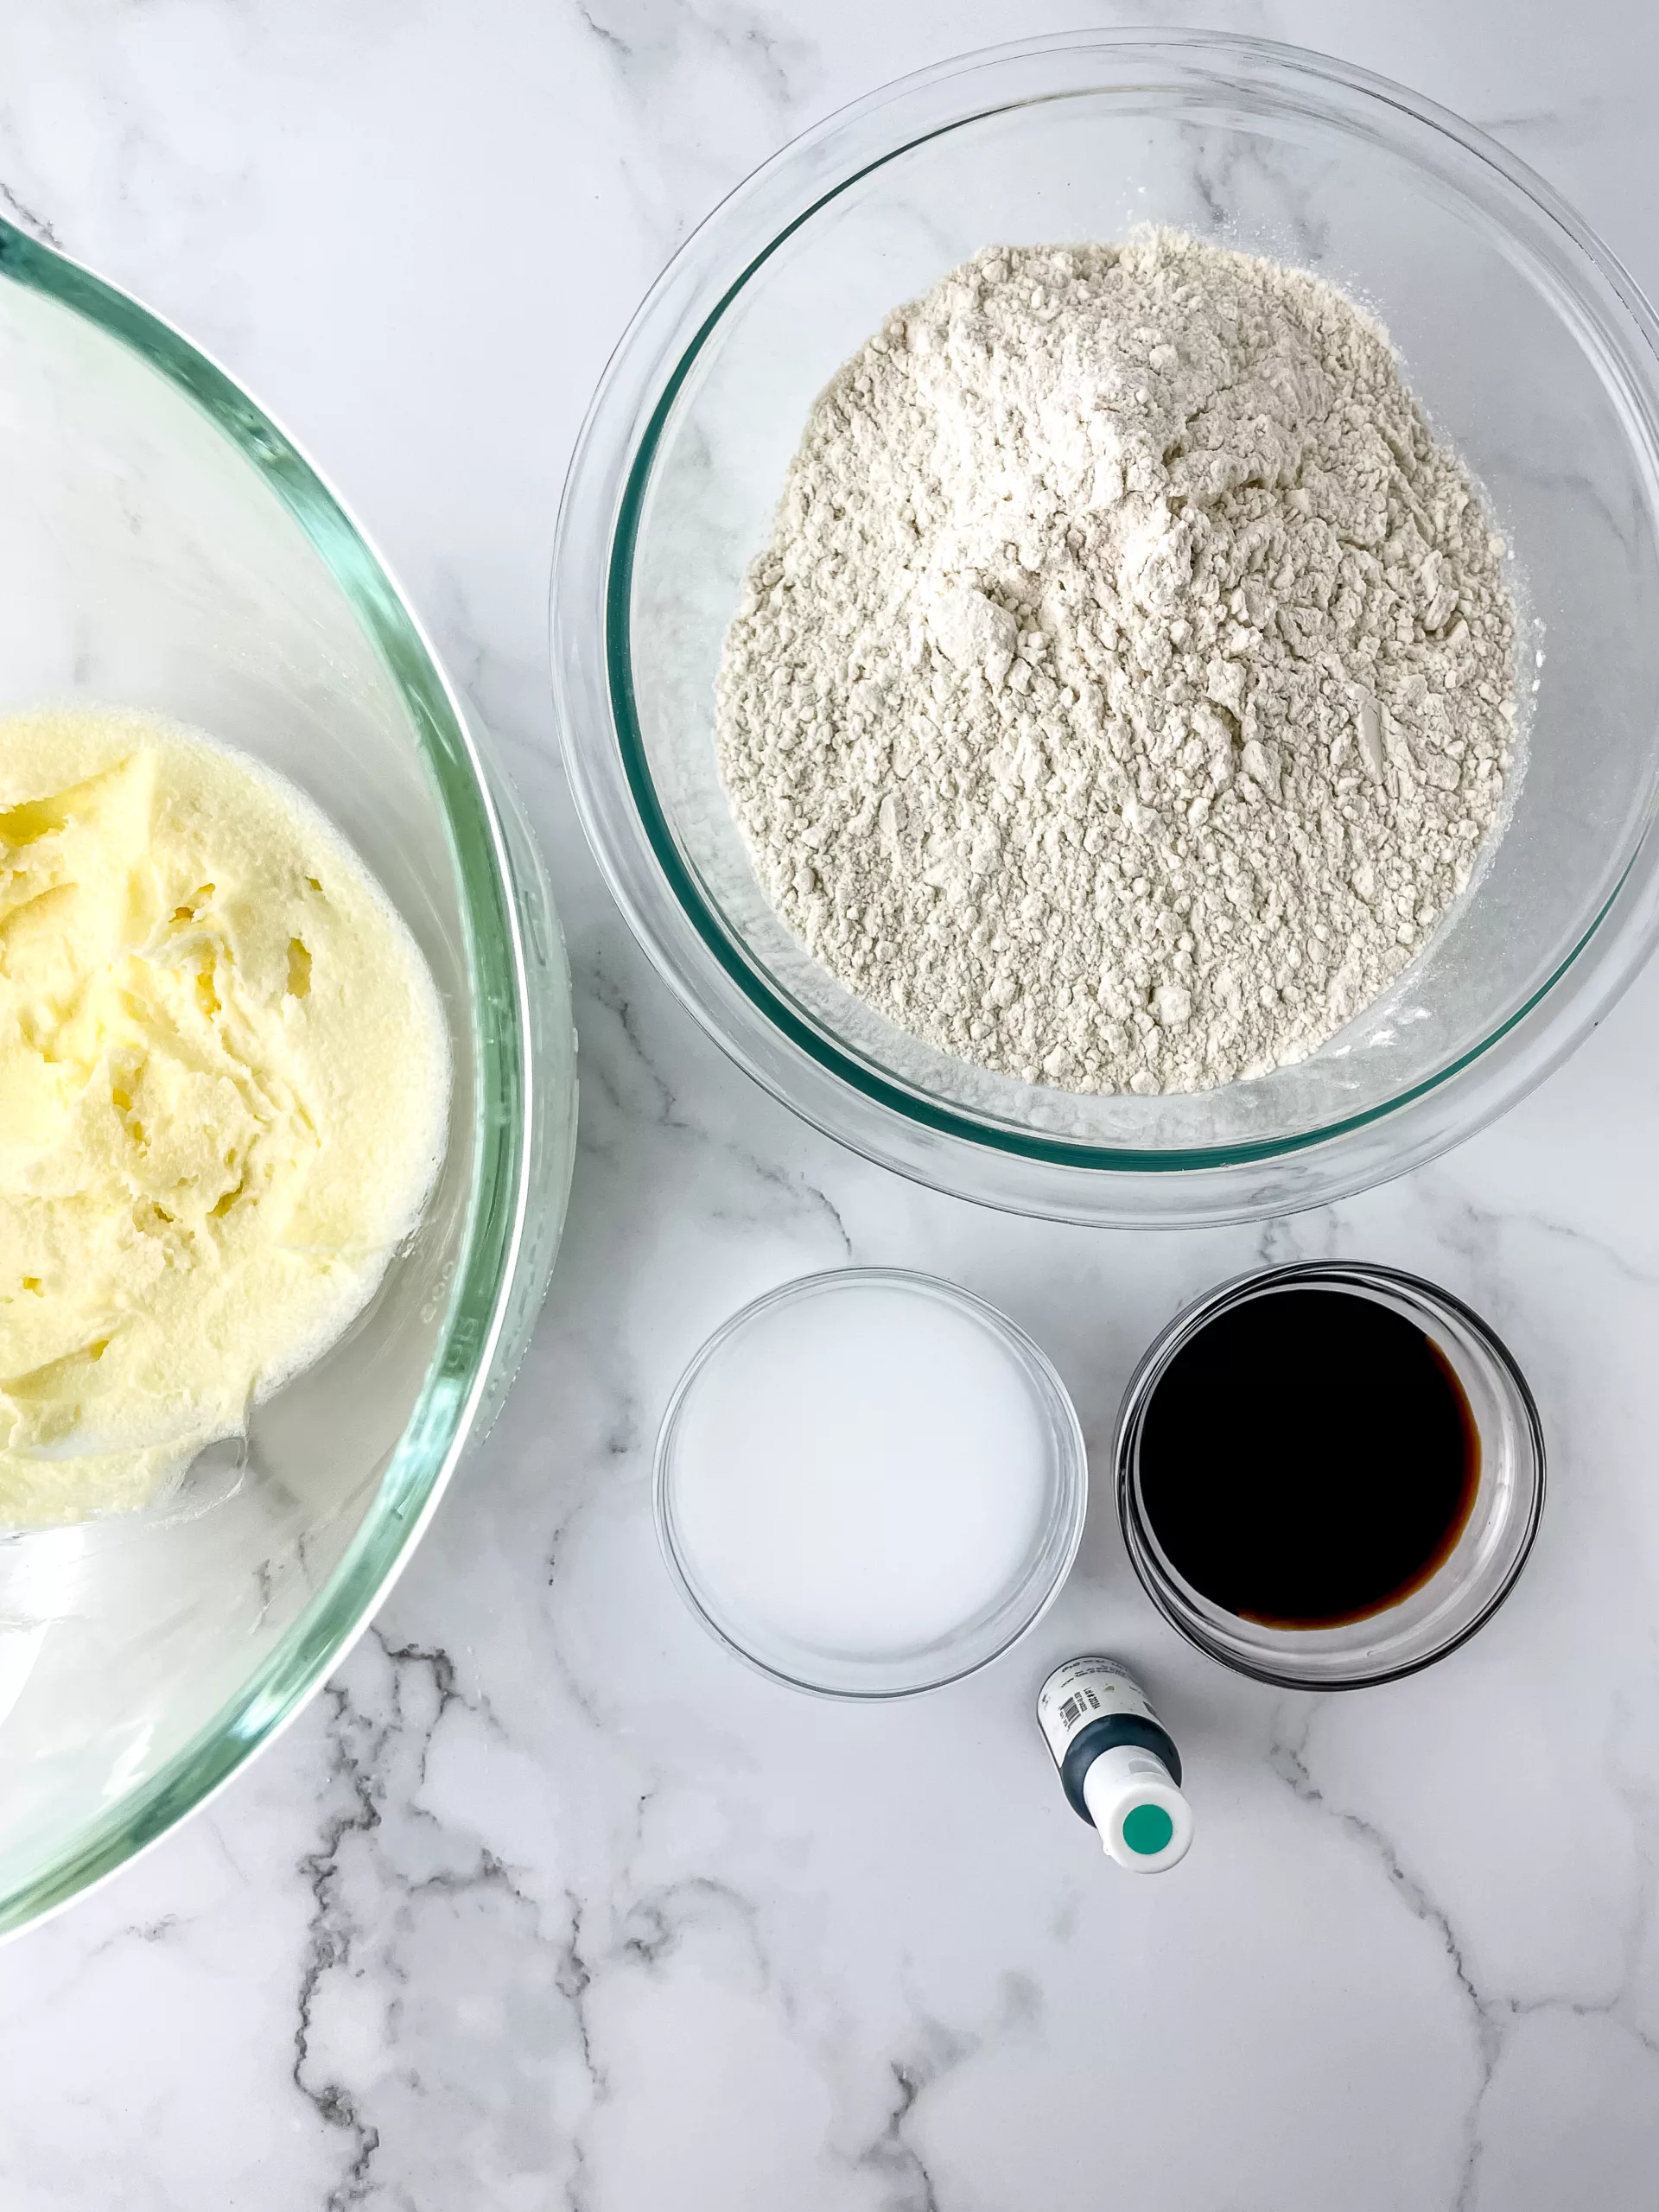
- 1 1/2 cups of All-Purpose Flour
- 1/2 cup of Salted Room Temperature Butter
- 1/2 cup of White Sugar
- 2 tablespoons of Milk
- 1 teaspoon of Vanilla Extract
- Turquoise Food Gel Color
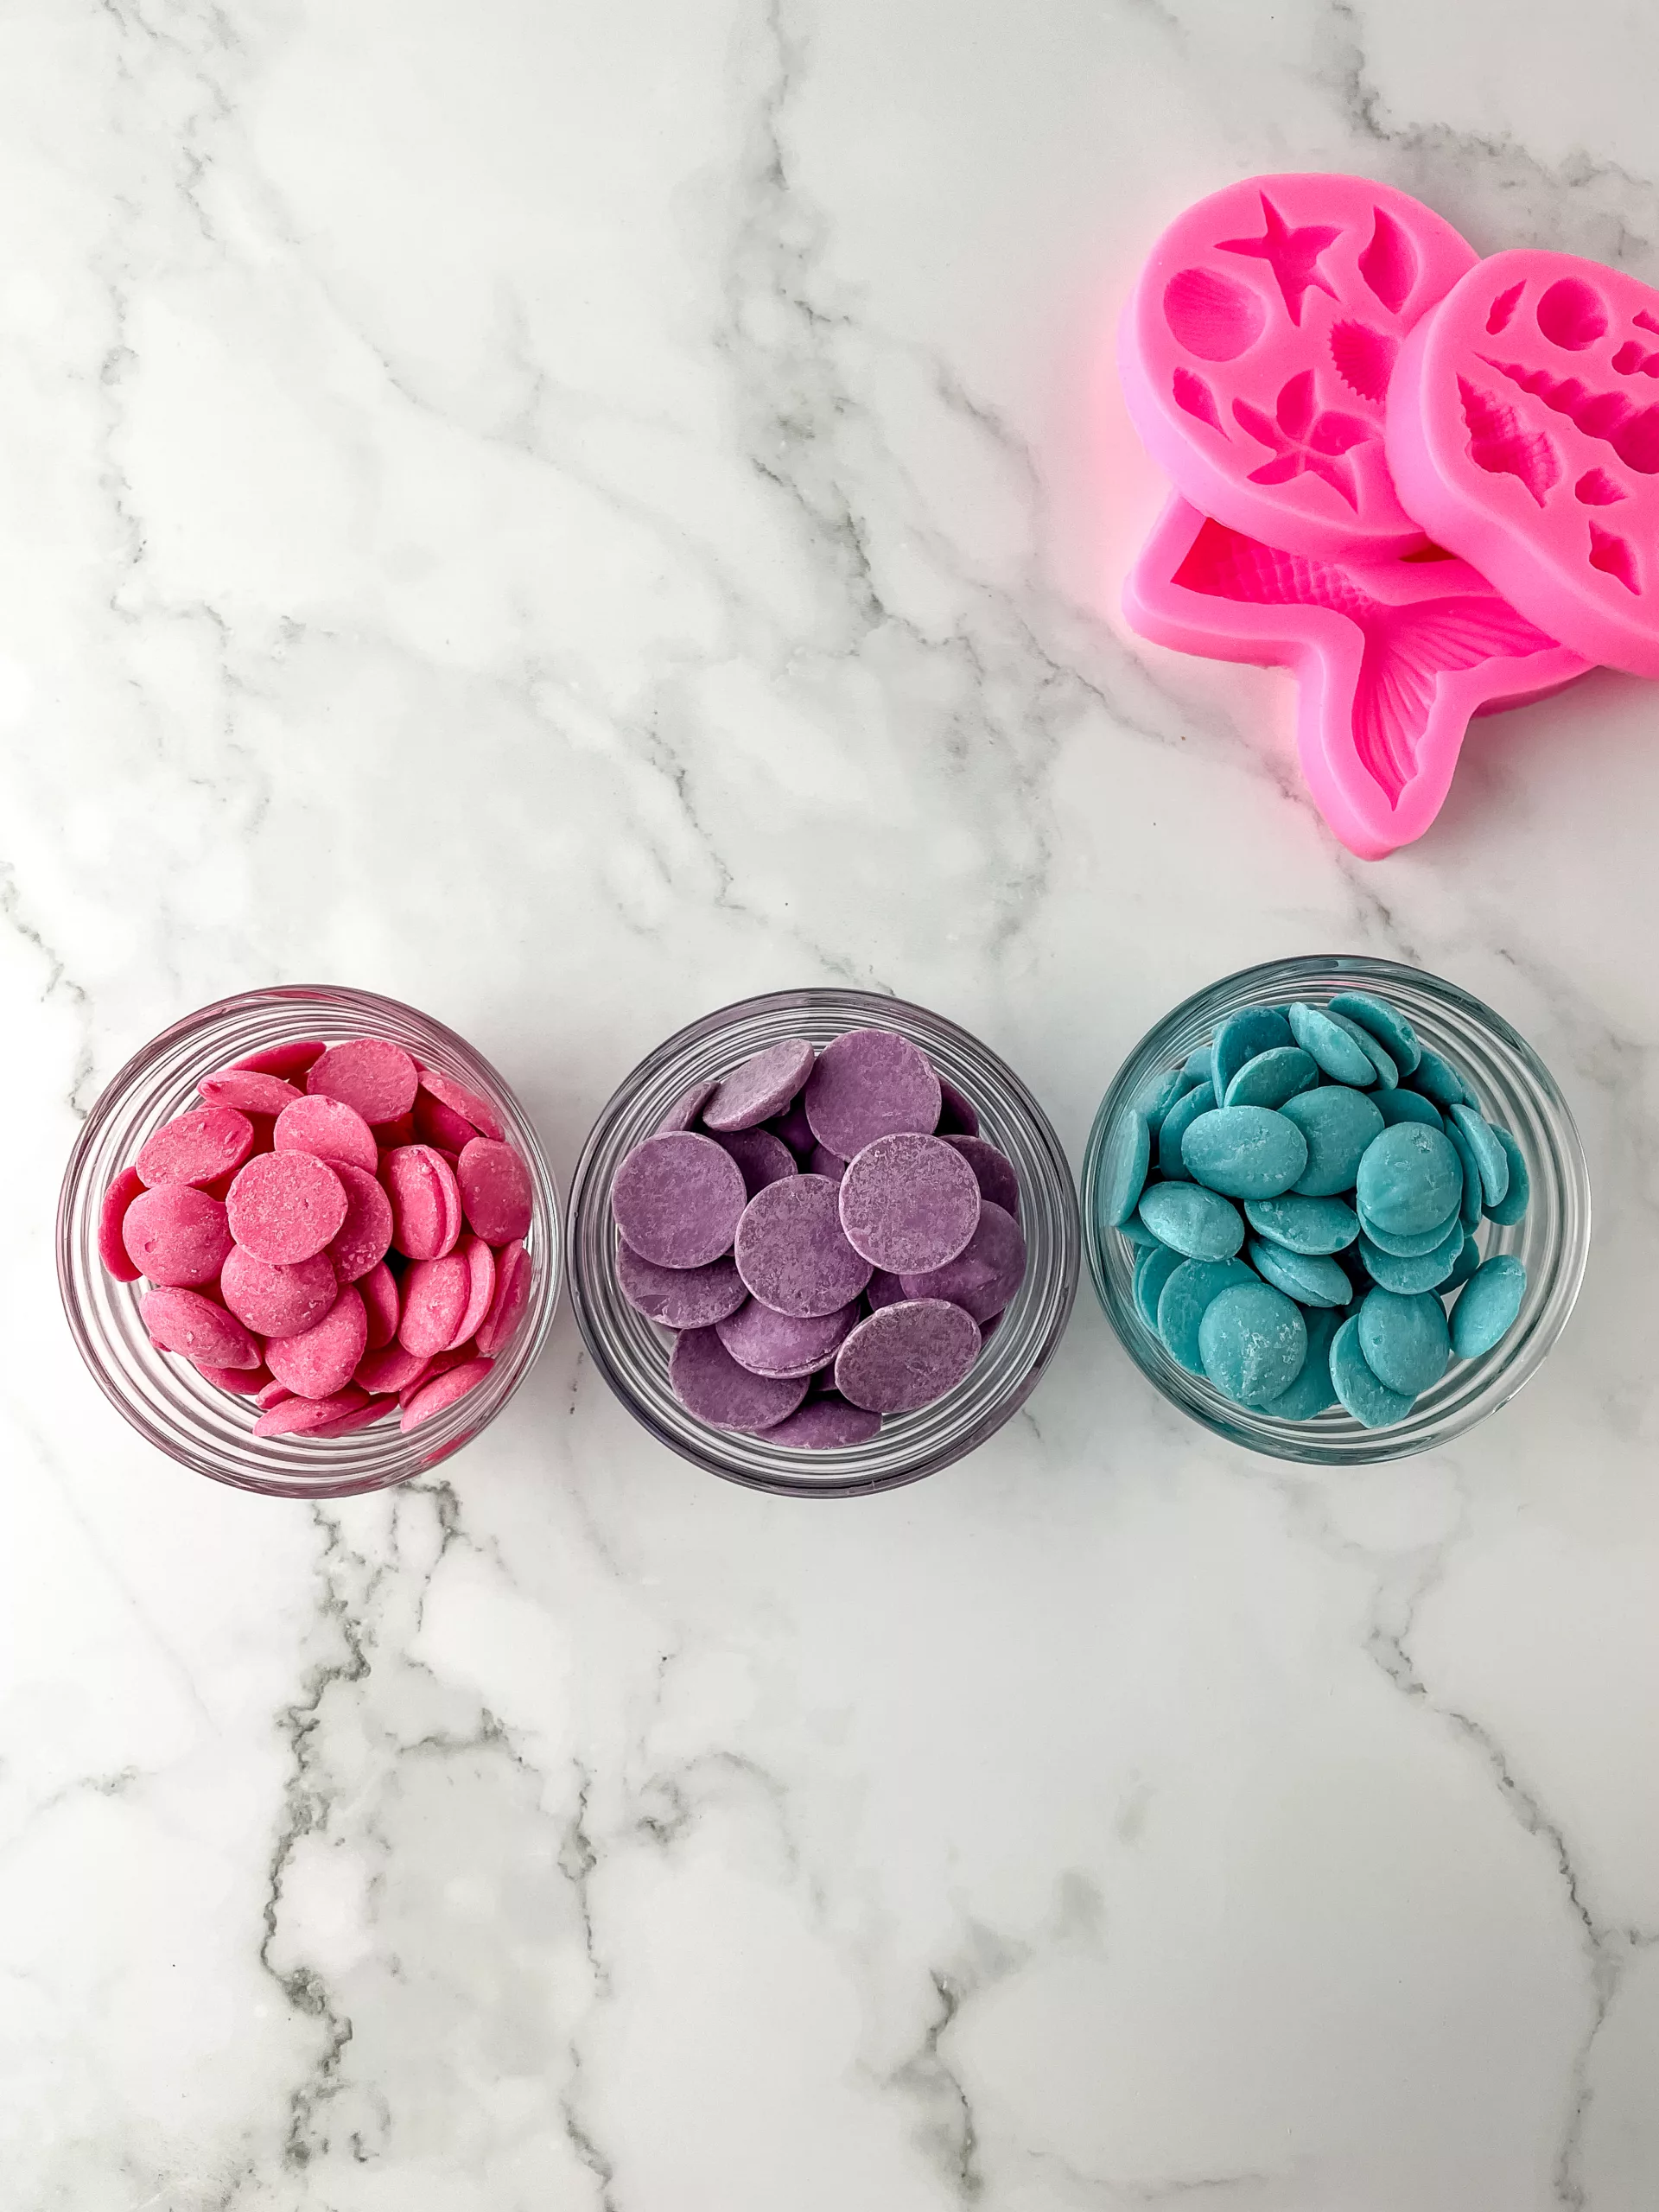
- 4 ounces of Pink Chocolate Melts
- 4 ounces of Blue Chocolate Melts
- 4 ounces of Lavender Chocolate Melts
- Sprinkle mix with Pink, White, and Lavender sprinkles
- Edible Gold Glitter
Instructions:
- Preheat your oven to 350 degrees Fahrenheit.
- Begin by gathering all your ingredients and preparing your cookie dough.
- In a large mixing bowl, cream together the butter and white sugar using an electric hand or stand mixer for approximately 5 minutes.
- Add the milk and vanilla extract to the mixture and continue to mix for about 1 minute.
- Gradually incorporate the all-purpose flour into the mixture and mix until all the ingredients are well combined, forming a dough (approximately 1 minute).
- Add 3-5 drops of turquoise food gel color to the dough and continue mixing until the entire dough turns a vibrant blue color.
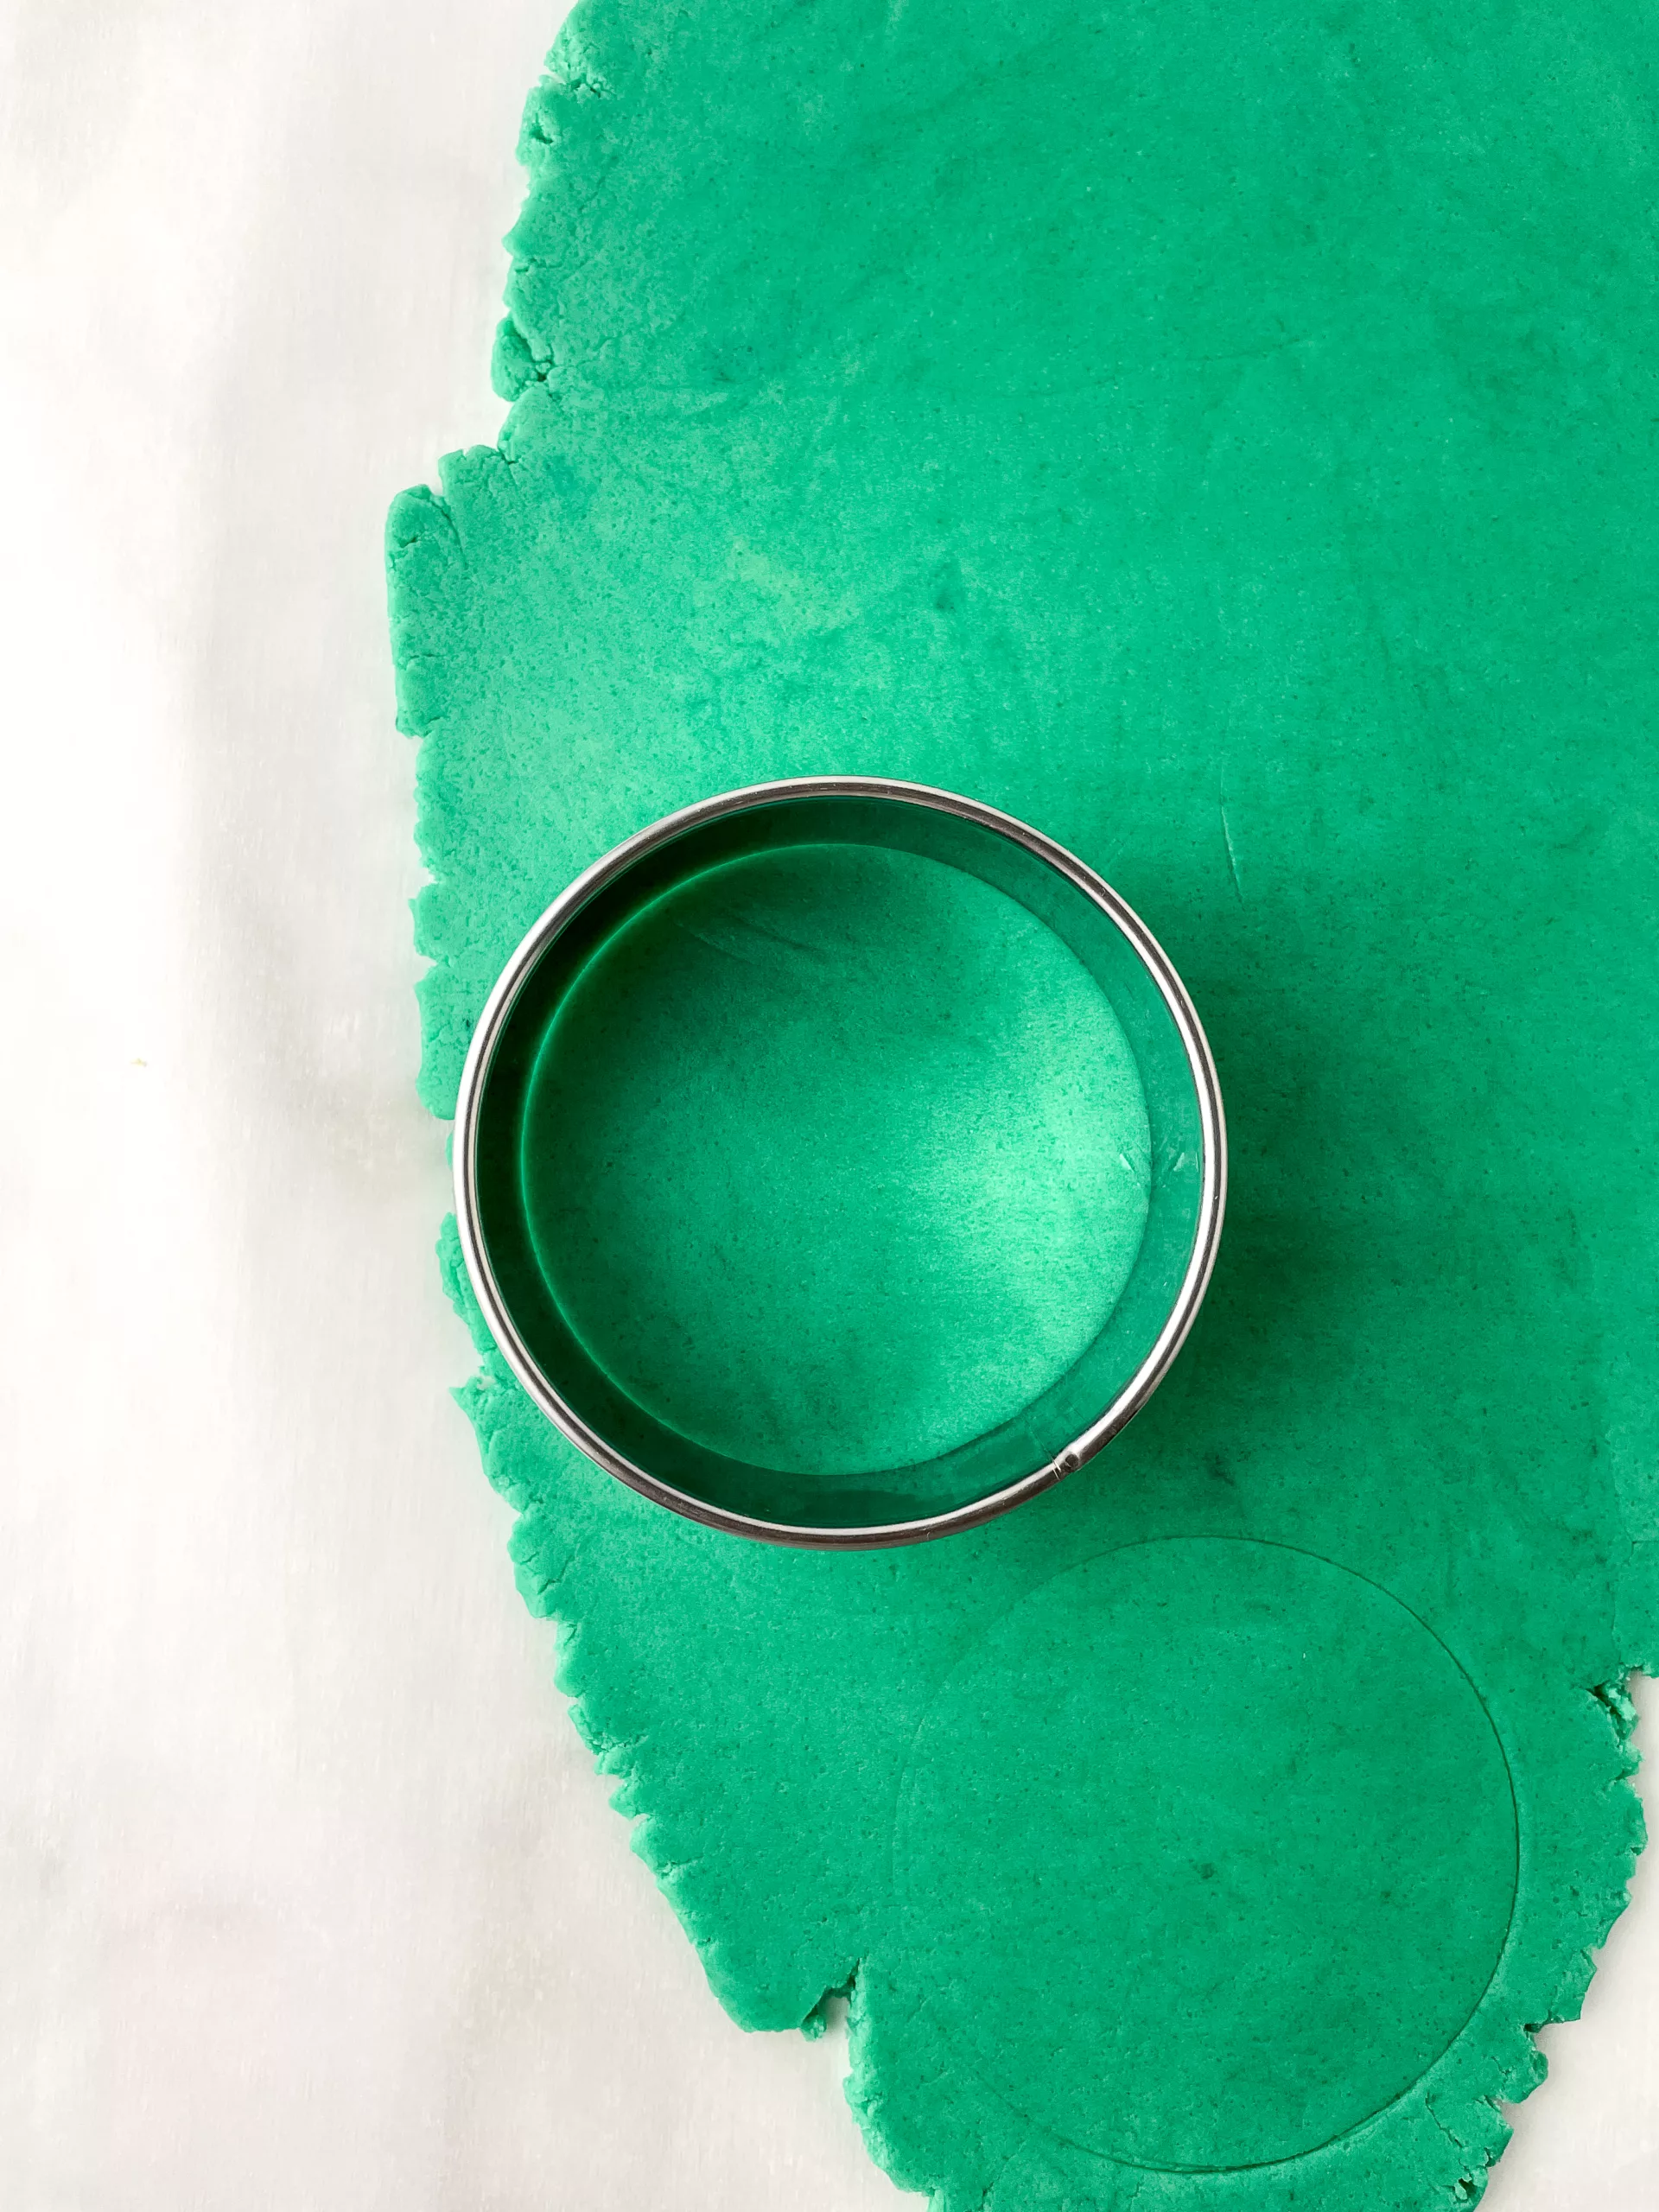
- Place a large sheet of parchment paper on a flat surface and transfer the cookie dough onto it.
- Cover the dough with another sheet of parchment paper and, using a rolling pin, roll it out until it reaches a thickness of about 1/4 inch.
- Remove the top sheet of parchment paper and use a circle cutter to cut out round cookies from the dough.
- Carefully transfer the circle cookies to a baking sheet lined with parchment paper or a baking mat using an offset spatula.
- Repeat the rolling and cutting process until all the dough is used.
- Bake the cookies in the preheated oven for 12-14 minutes.
- Once baked, remove the cookies from the oven and allow them to cool on a flat surface.
- While the cookies are cooling down, let’s prepare the chocolate mermaid pieces.
Preparing the Chocolate Pieces:
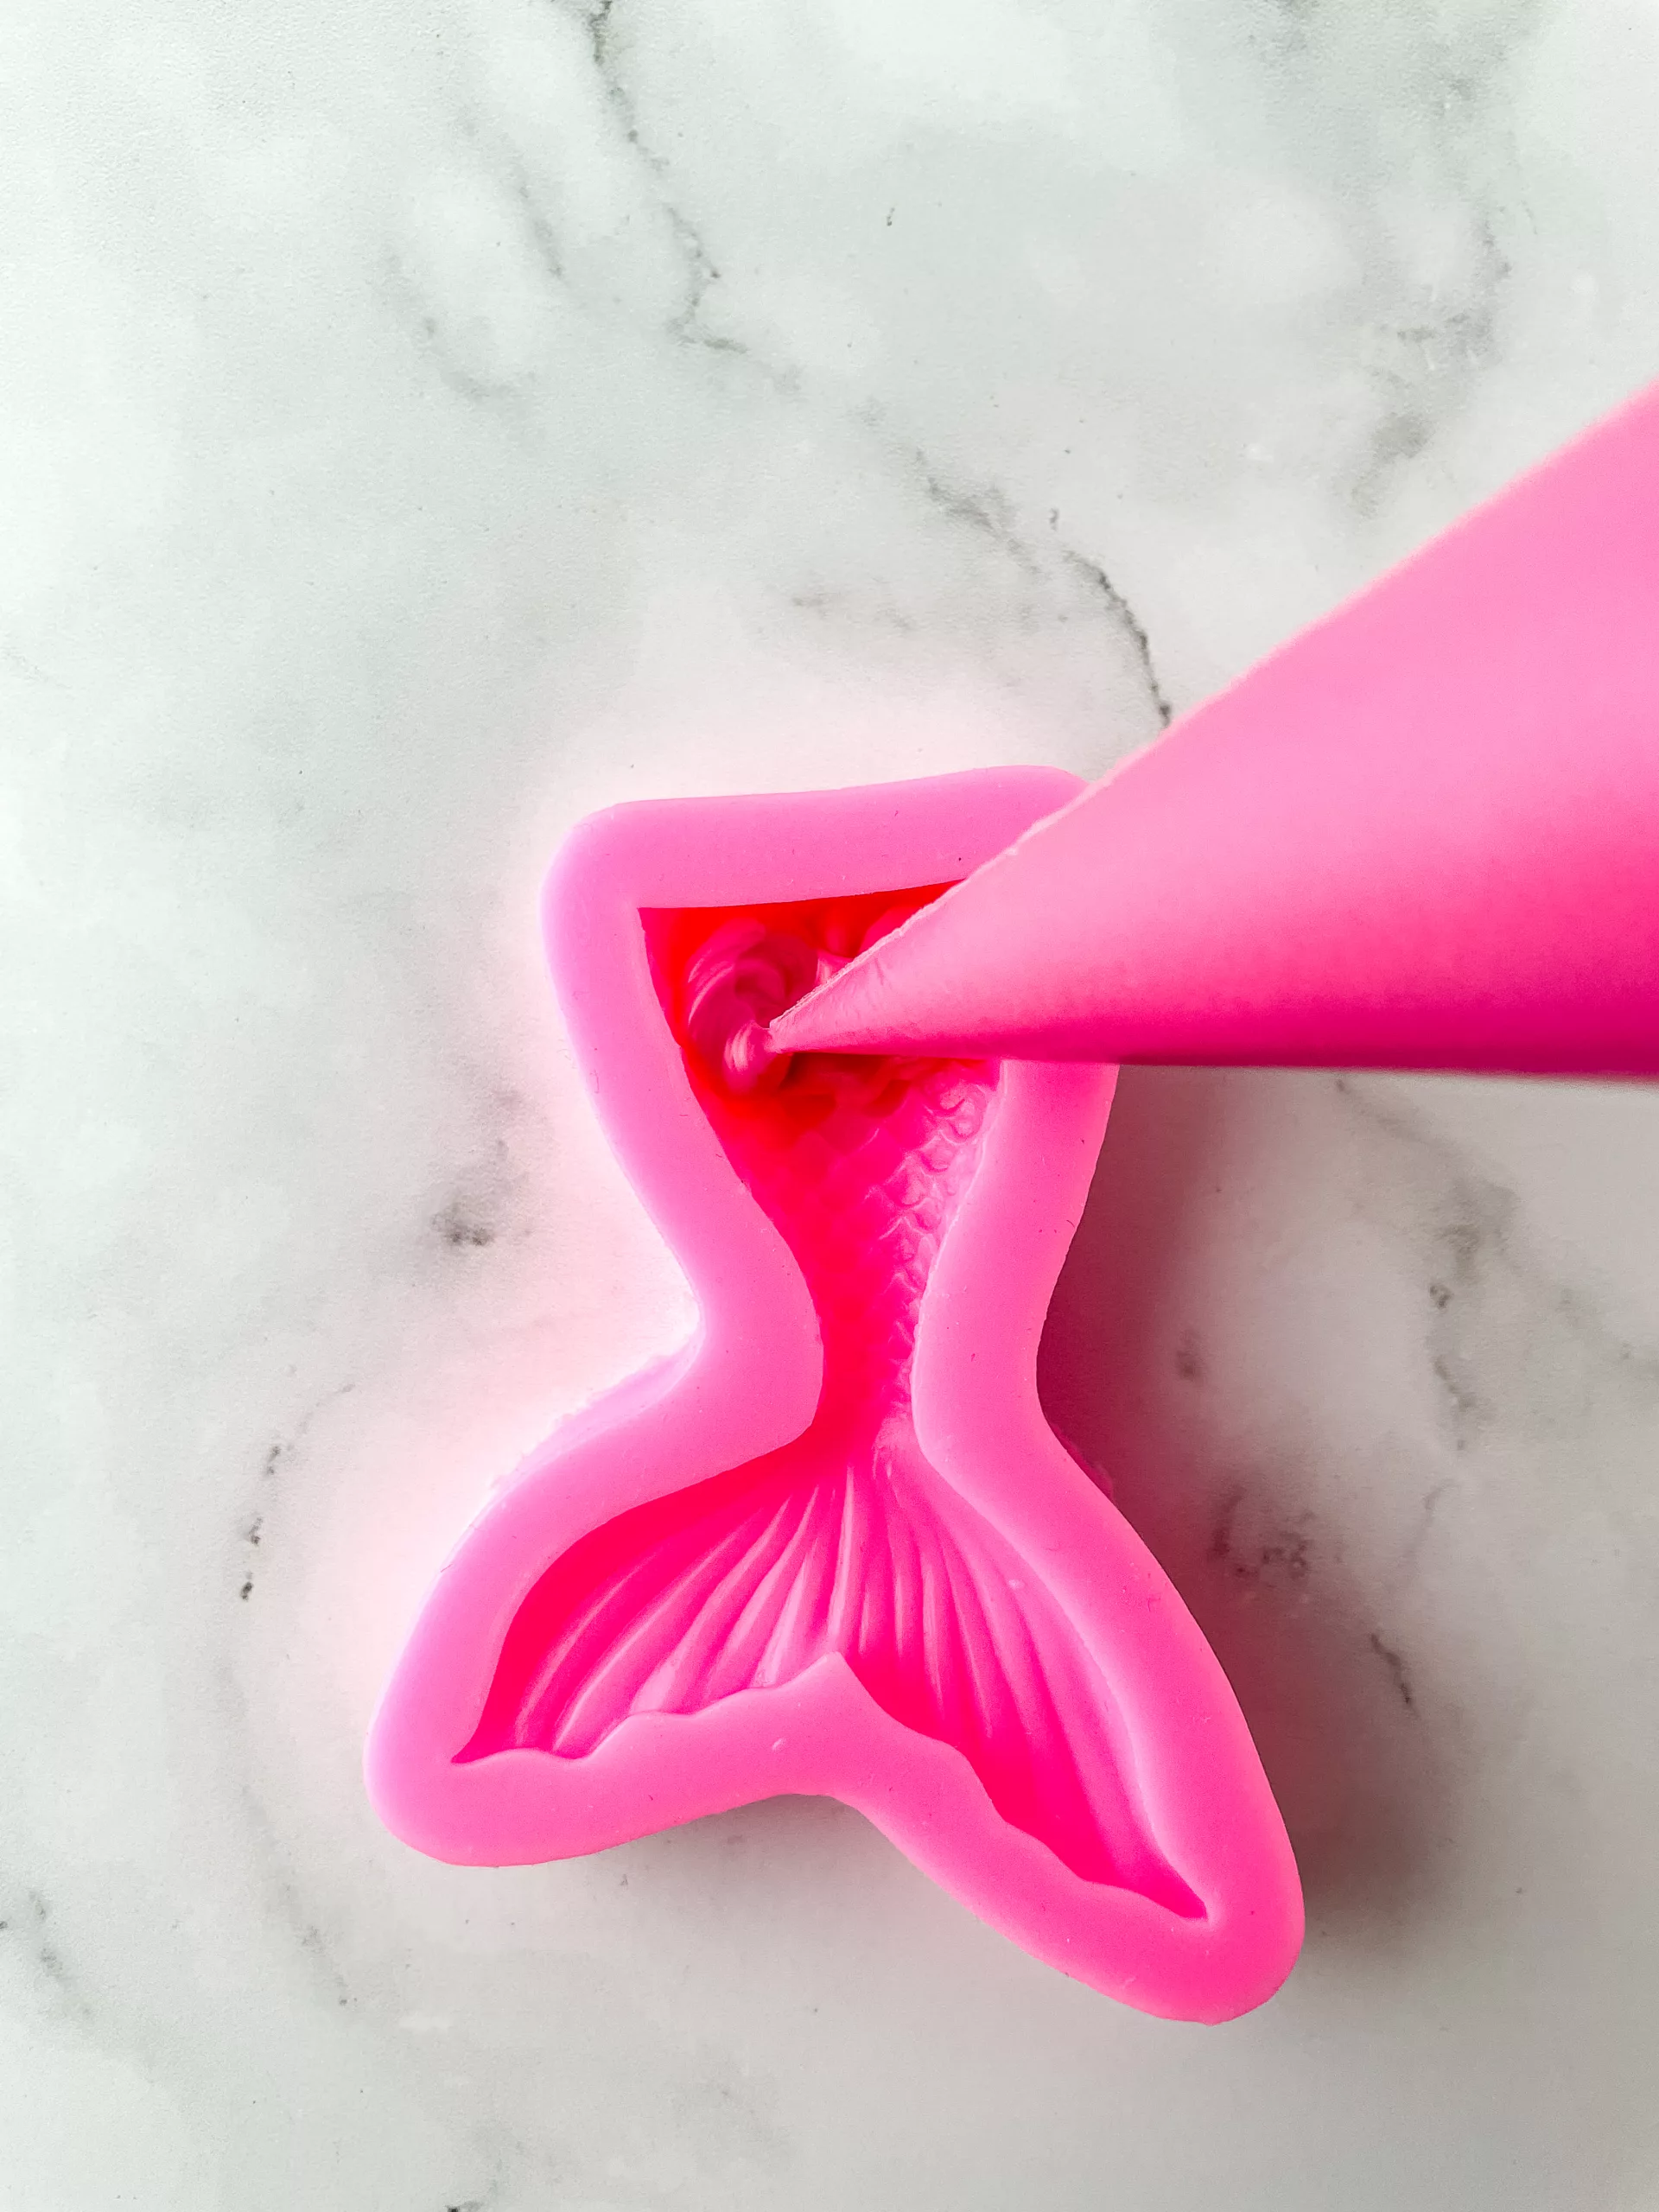
- Clean and dry your mermaid/sea shell molds.
- Start with one color of melting chocolate at a time.
- Microwave the chocolate in 30-second intervals, stirring in between, until it melts smoothly.
- Transfer the melted chocolate into a piping bag, then tie the ends and cut off a small hole at the front tip.
- Fill the molds with the melted chocolate and place them in the freezer for 5-8 minutes.
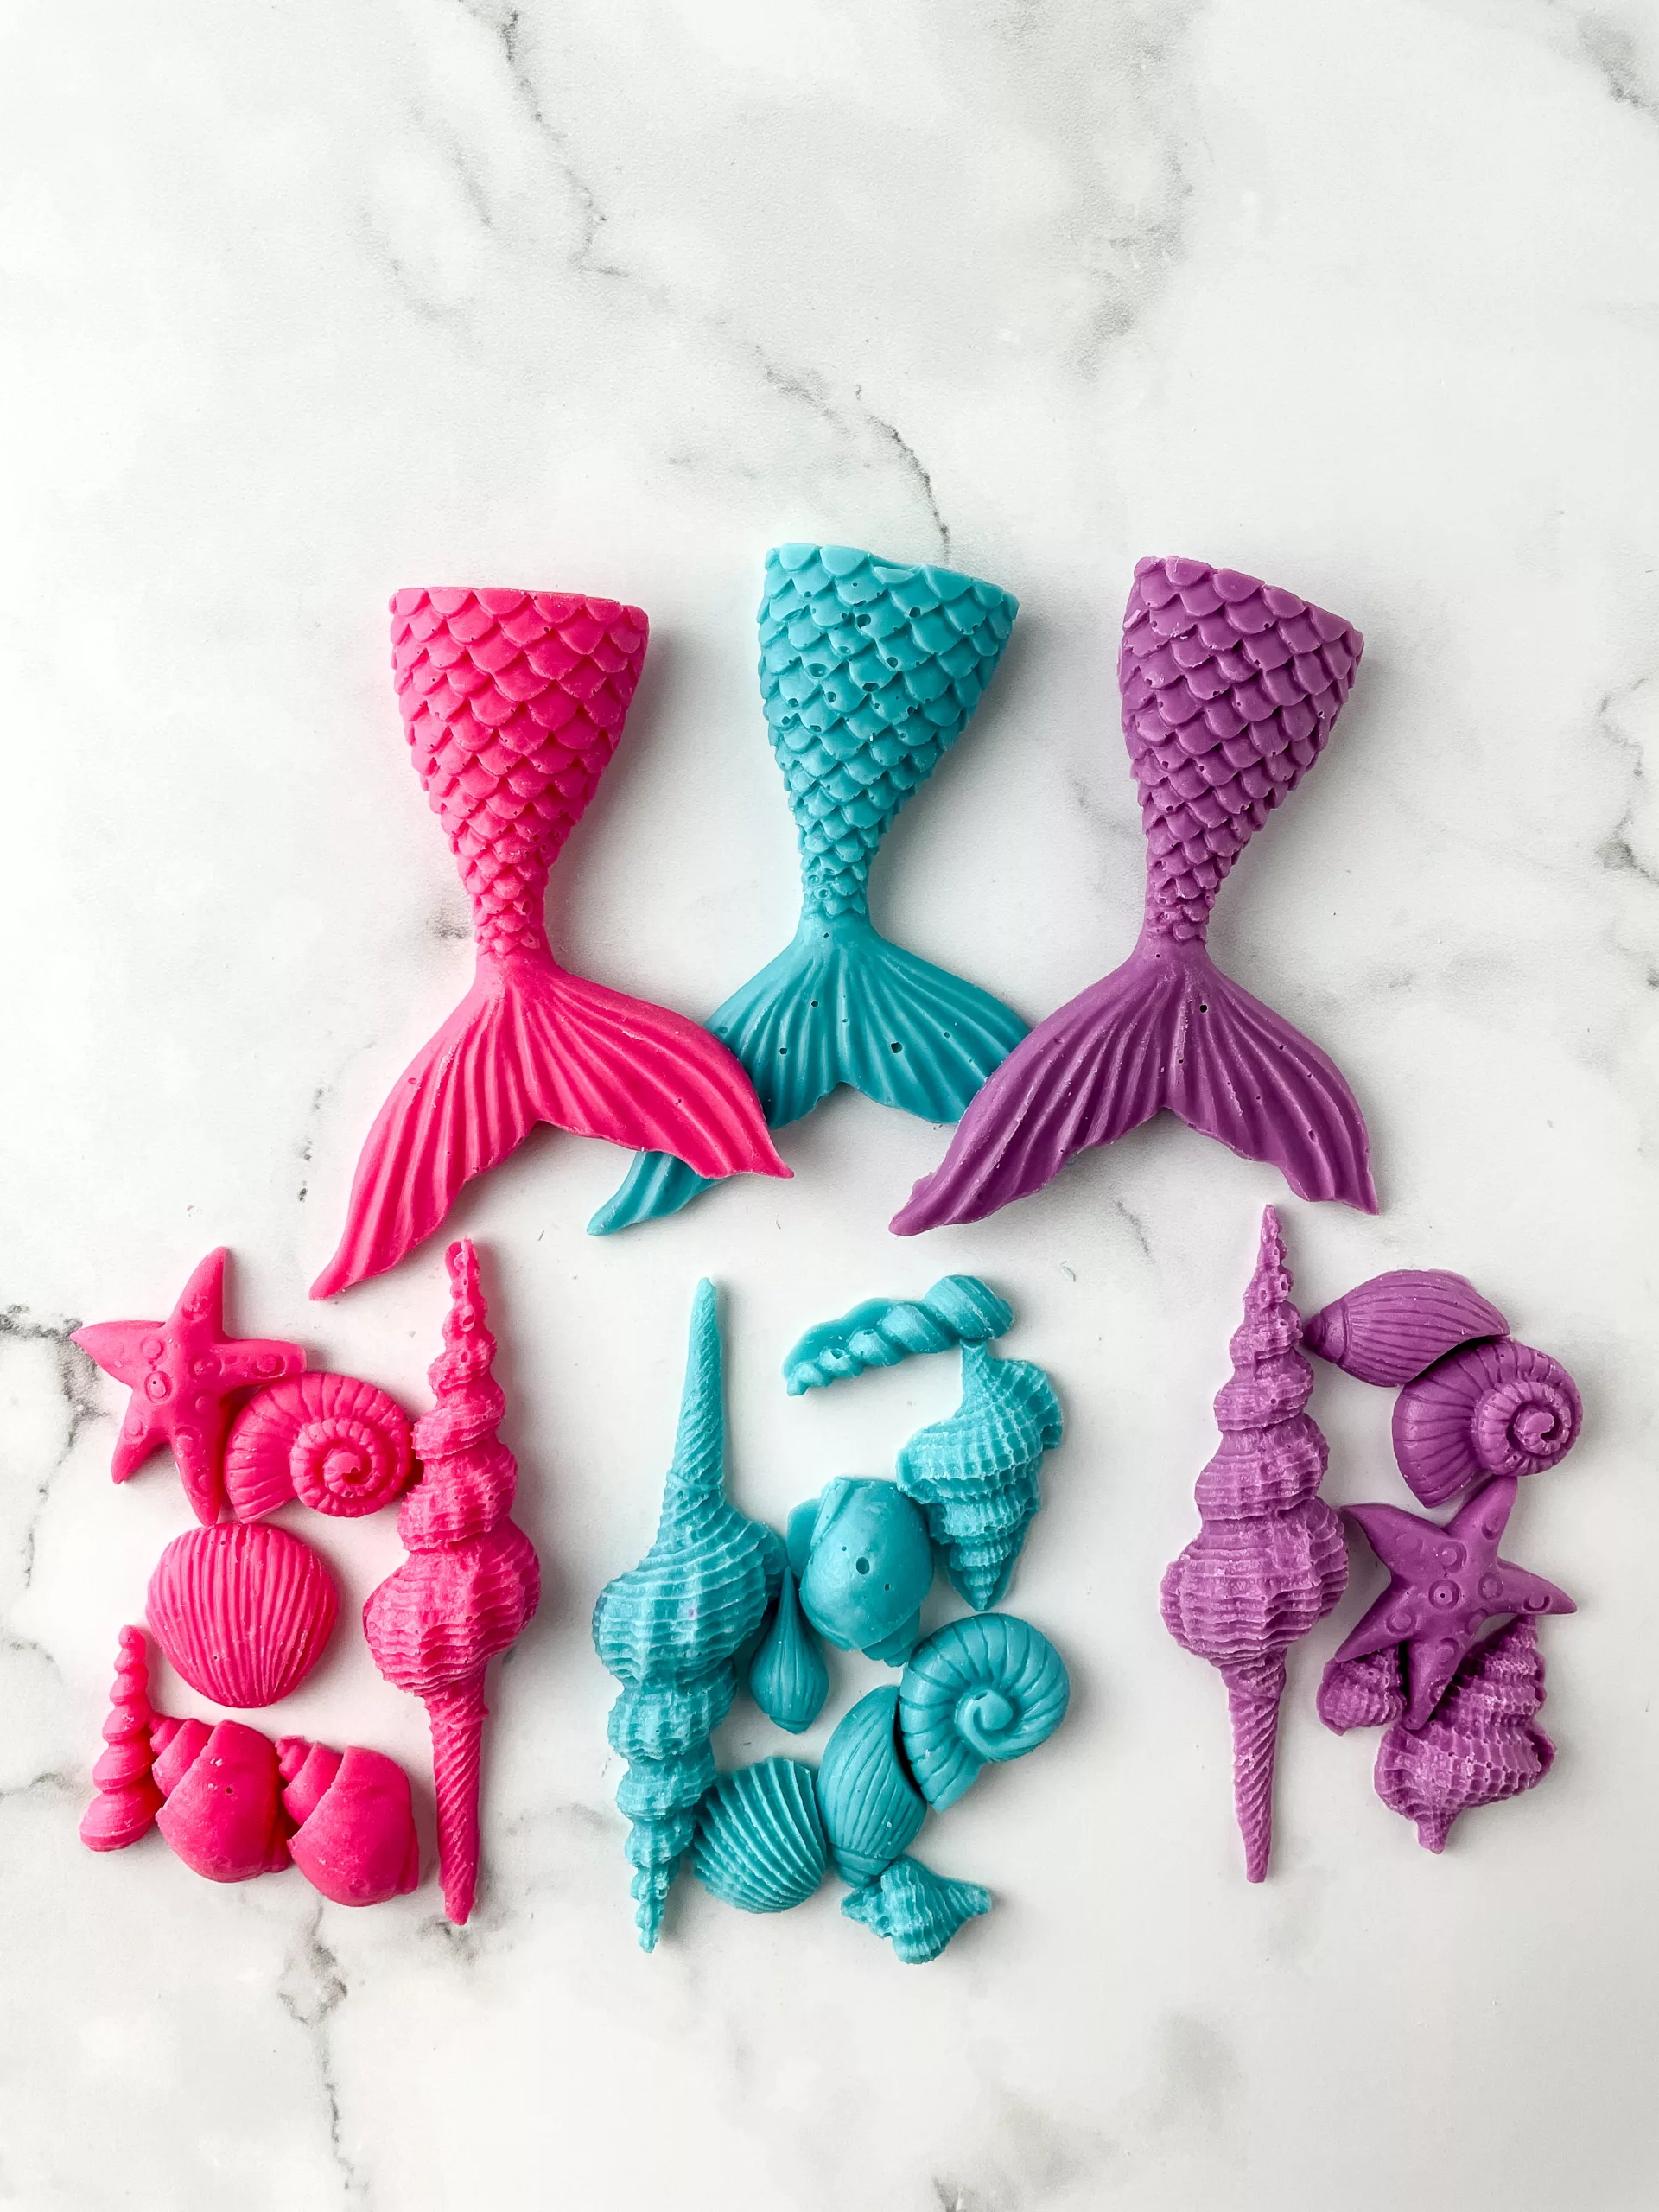
- Once frozen, carefully remove the chocolate pieces from the molds by separating the sides and turning them over.
- Repeat the steps above for each color of chocolate (pink, blue, and lavender), ensuring you melt and mold them separately.
- If any of the chocolate pieces don’t come out perfectly or break, don’t worry! You can reheat them in the microwave until they become liquid again and reuse them.
- If any pieces are broken, you can use some warm melted chocolate to reattach them. Allow a couple of minutes for the chocolate to cool and set.
Assembling the Cookies:
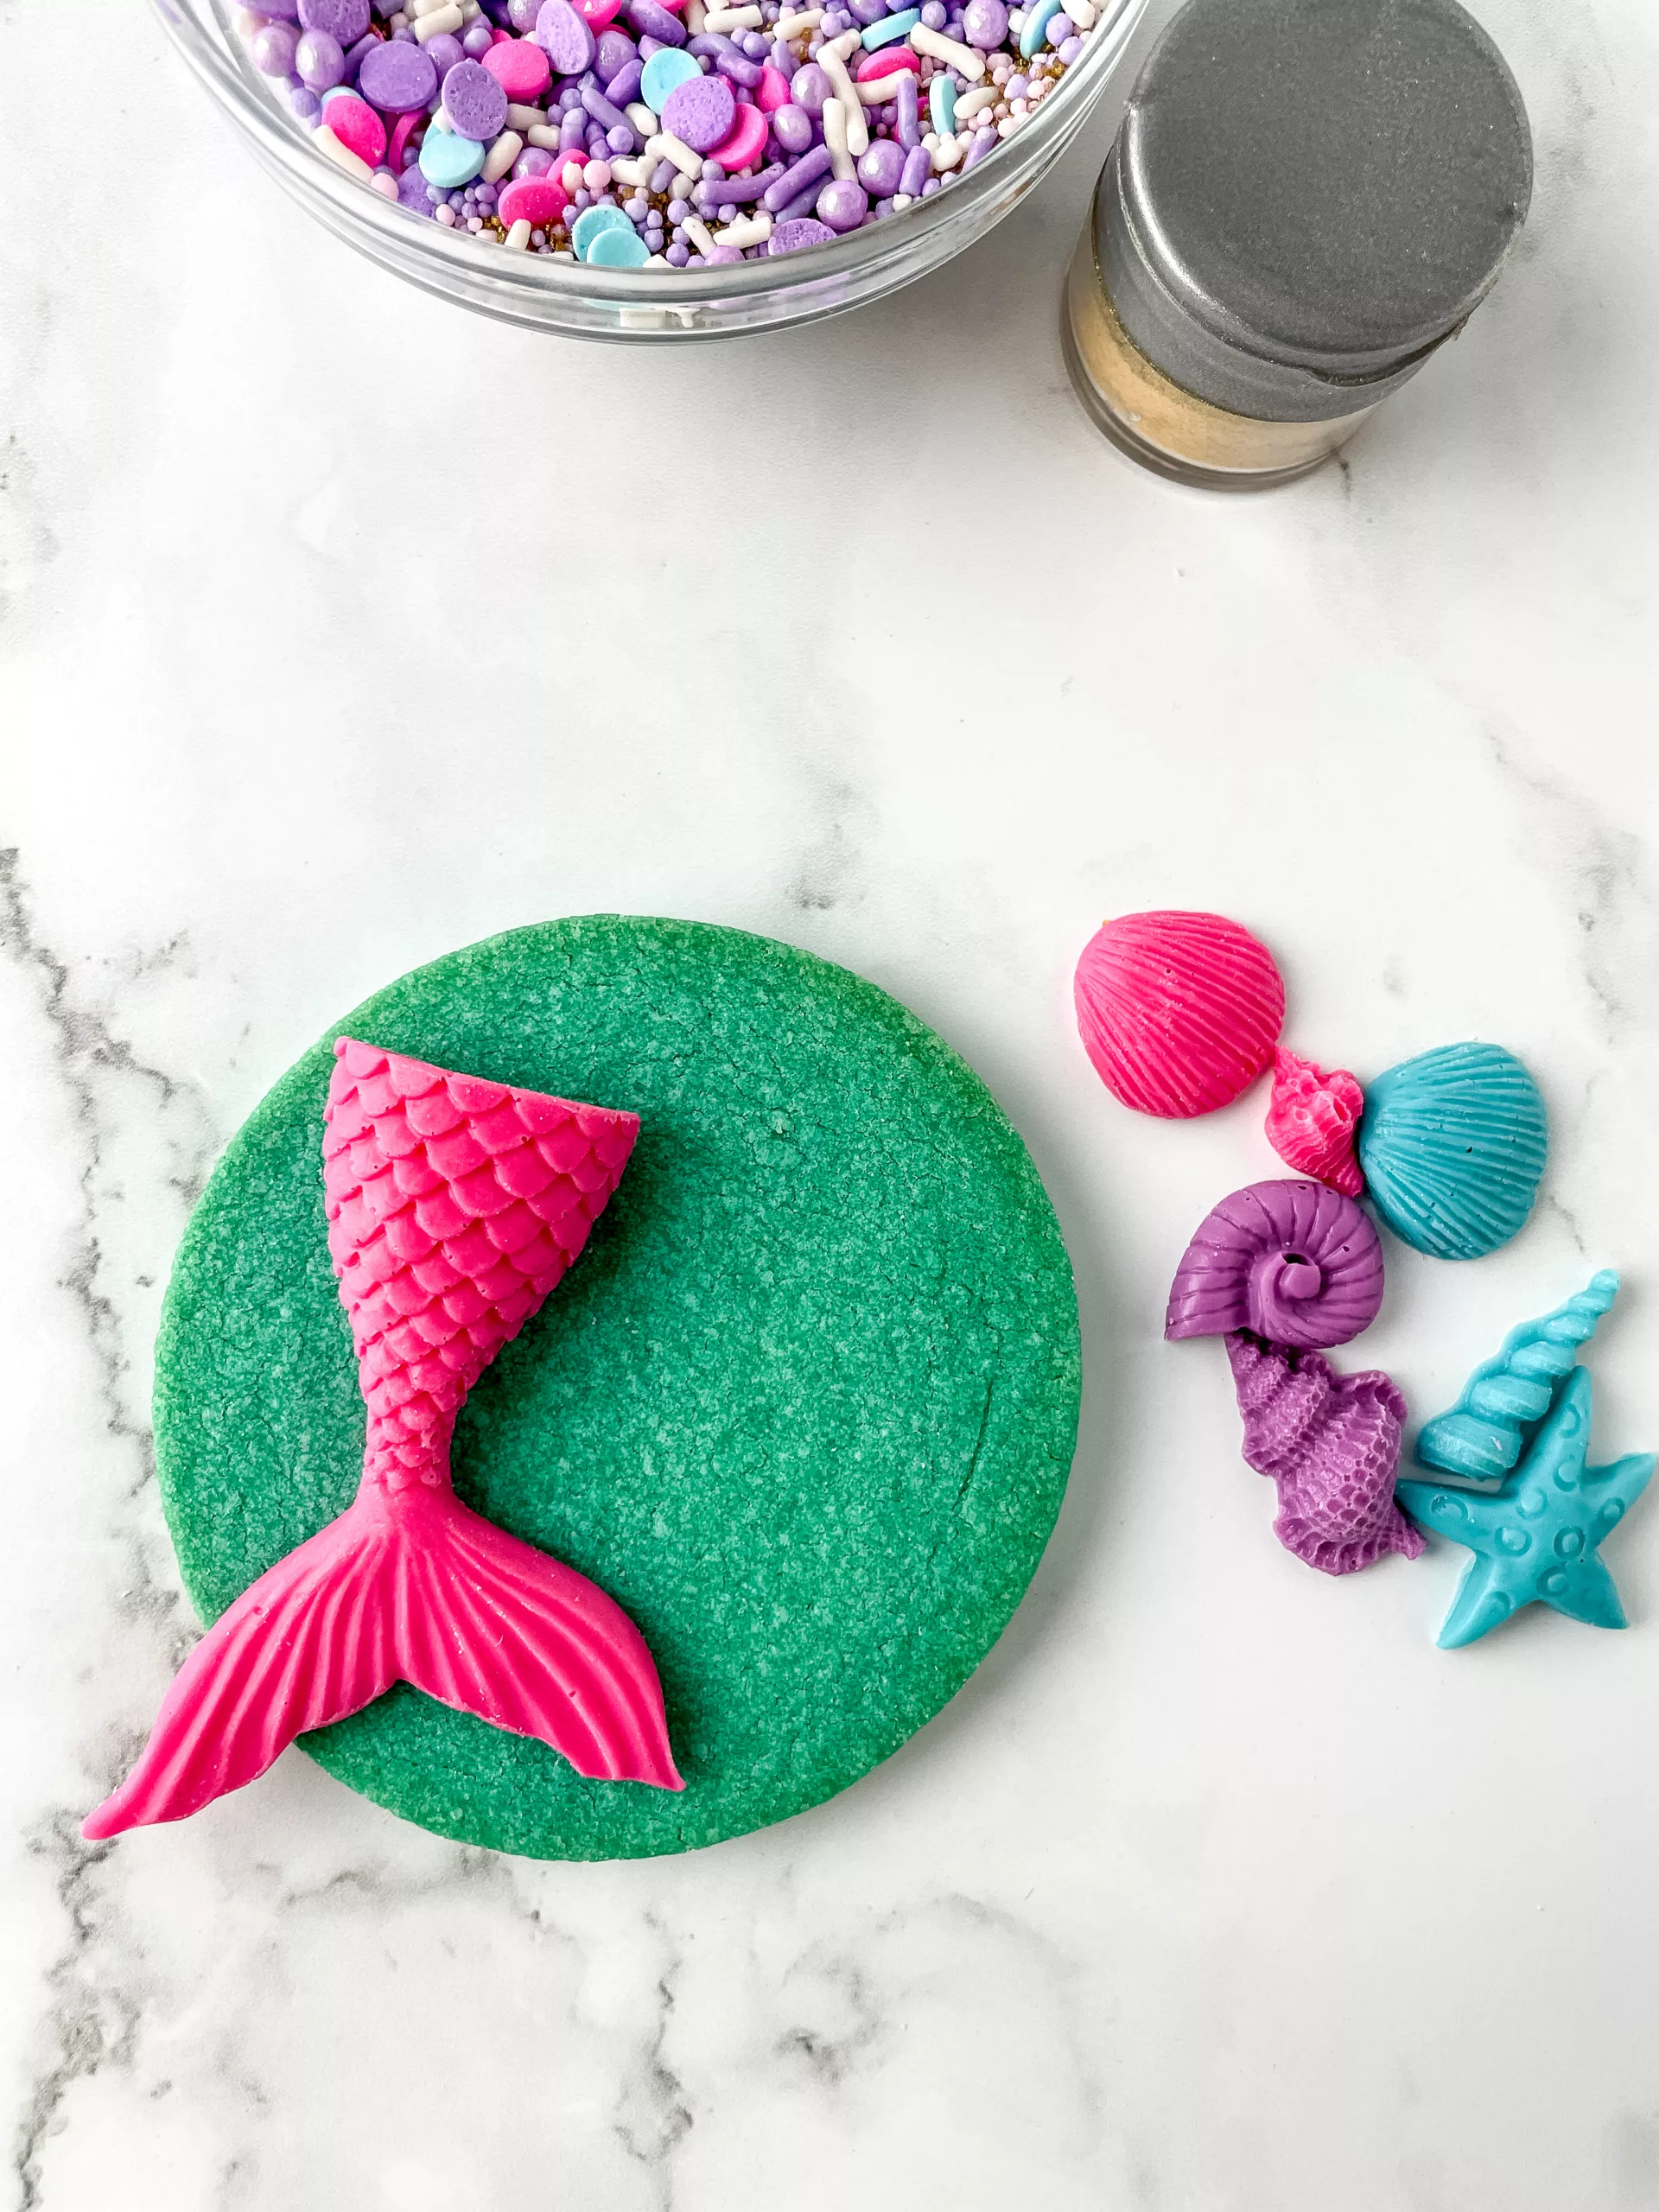
- Gather all your decorating items: the baked cookies, chocolate mermaid pieces, sprinkle mix, edible glitter, and the remaining melted chocolate.
- Start by placing the mermaid tail, the largest piece, onto the cookie to determine its placement.
- Using the leftover melted chocolate, apply a small amount to the back of the mermaid tail and affix it to the cookie.
- Repeat this step with the remaining chocolate mermaid and sea shell pieces, arranging them creatively on the cookies.
- Use the melted chocolate to create additional designs on the cookies, allowing your creativity to flow.
- Quickly sprinkle the sprinkle mix over the chocolate designs to add a pop of color and texture.
- Lastly, generously sprinkle edible gold glitter over the entire cookie for a magical touch.
- Repeat these steps for each cookie until all of them are beautifully decorated.
Finishing Touches and Storage:
- Place the completed cookies on a clean, flat surface or a decorative platter for serving.
- Now it’s time to enjoy the fruits of your labor! Indulge in these delightful mermaid cookies and savor the magical flavors.
- If you have any leftover cookies, store them in an airtight container in a cool, dry place for up to 3 days.
- Alternatively, you can freeze the cookies for up to 10 days. Keep in mind that the appearance of the chocolate may change slightly after freezing.
- When you’re ready to enjoy the frozen cookies, allow them to come to room temperature inside the container before removing them for consumption.
Note:
- To save time, consider having two sets of mermaid molds to cut the preparation time in half.
- If any of the chocolate pieces don’t turn out as expected, you can always remelt them and try again.
- Broken pieces can be fixed by reattaching them using some warm melted chocolate.
- Remember to store the cookies properly in an airtight container to maintain their freshness.
Delicious and Whimsical Mermaid Cookies (Eggless Recipe)
Equipment
- Measuring Cup
- Measuring Spoons
- Large Bowl
- Hand or Stand Mixer
- Parchment Paper
- Rolling Pin
- Circle Cutter
- Offset Spatula
- Cookie Baking Sheet
- Mermaid Molds
- Piping Bags
- Scissors
Ingredients
- 1 1/2 cups All-Purpose Flour
- 1/2 cup Salted Room Temperature Butter
- 1/2 cup White Sugar
- 2 tbsp Milk
- 1 tsp Vanilla Extract
- Turquoise Food Gel Color
- 4 oz Pink Chocolate Melts
- 4 oz Blue Chocolate Melts
- 4 0z Lavender Chocolate Melts
- Sprinkle mix with Pink, White, and Lavender sprinkles
- Edible Gold Glitter
Instructions
- Preheat your oven to 350 degrees Fahrenheit.
- Begin by gathering all your ingredients and preparing your cookie dough.
- In a large mixing bowl, cream together the butter and white sugar using an electric hand or stand mixer for approximately 5 minutes.
- Add the milk and vanilla extract to the mixture and continue to mix for about 1 minute.
- Gradually incorporate the all-purpose flour into the mixture and mix until all the ingredients are well combined, forming a dough (approximately 1 minute).
- Add 3-5 drops of turquoise food gel color to the dough and continue mixing until the entire dough turns a vibrant blue color.
- Place a large sheet of parchment paper on a flat surface and transfer the cookie dough onto it.
- Cover the dough with another sheet of parchment paper and, using a rolling pin, roll it out until it reaches a thickness of about 1/4 inch.
- Remove the top sheet of parchment paper and use a circle cutter to cut out round cookies from the dough.
- Carefully transfer the circle cookies to a baking sheet lined with parchment paper or a baking mat using an offset spatula.
- Repeat the rolling and cutting process until all the dough is used.
- Bake the cookies in the preheated oven for 12-14 minutes.
- Once baked, remove the cookies from the oven and allow them to cool on a flat surface.
- While the cookies are cooling down, let's prepare the chocolate mermaid pieces.
Preparing the Chocolate Pieces:
- Clean and dry your mermaid/sea shell molds.
- Start with one color of melting chocolate at a time.
- Microwave the chocolate in 30-second intervals, stirring in between, until it melts smoothly.
- Transfer the melted chocolate into a piping bag, then tie the ends and cut off a small hole at the front tip.
- Fill the molds with the melted chocolate and place them in the freezer for 5-8 minutes.
- Once frozen, carefully remove the chocolate pieces from the molds by separating the sides and turning them over.
- Repeat the steps above for each color of chocolate (pink, blue, and lavender), ensuring you melt and mold them separately.
- If any of the chocolate pieces don't come out perfectly or break, don't worry! You can reheat them in the microwave until they become liquid again and reuse them.
- If any pieces are broken, you can use some warm melted chocolate to reattach them. Allow a couple of minutes for the chocolate to cool and set.
Assembling the Cookies:
- Gather all your decorating items: the baked cookies, chocolate mermaid pieces, sprinkle mix, edible glitter, and the remaining melted chocolate.
- Start by placing the mermaid tail, the largest piece, onto the cookie to determine its placement.
- Using the leftover melted chocolate, apply a small amount to the back of the mermaid tail and affix it to the cookie.
- Repeat this step with the remaining chocolate mermaid and sea shell pieces, arranging them creatively on the cookies.
- Use the melted chocolate to create additional designs on the cookies, allowing your creativity to flow.
- Quickly sprinkle the sprinkle mix over the chocolate designs to add a pop of color and texture.
- Lastly, generously sprinkle edible gold glitter over the entire cookie for a magical touch.
- Repeat these steps for each cookie until all of them are beautifully decorated.
Finishing Touches and Storage:
- Place the completed cookies on a clean, flat surface or a decorative platter for serving.
- Now it's time to enjoy the fruits of your labor! Indulge in these delightful mermaid cookies and savor the magical flavors.
- If you have any leftover cookies, store them in an airtight container in a cool, dry place for up to 3 days.
- Alternatively, you can freeze the cookies for up to 10 days. Keep in mind that the appearance of the chocolate may change slightly after freezing.
- When you're ready to enjoy the frozen cookies, allow them to come to room temperature inside the container before removing them for consumption.
Notes
- To save time, consider having two sets of mermaid molds to cut the preparation time in half.
- If any of the chocolate pieces don't turn out as expected, you can always remelt them and try again.
- Broken pieces can be fixed by reattaching them using some warm melted chocolate.
- Remember to store the cookies properly in an airtight container to maintain their freshness.