How to Create the White Crackle Effect on Cutout Cookies Tutorial
Greetings, bakers and decorators! If you’re on the hunt for a simple yet stunning cookie decoration technique that adds texture, dimension, and a sometimes touch of elegance to your baked creations, look no further than our White Crackle Effect Tutorial.
Equipment
- Cookie Cutter
- Rolling Pin
- Parchment Paper
- Paint Brush
- Paint Palette
- Cookie Sheet
Ingredients
- Cookie Dough using your recipe of choice.
- White Americolor Gel Food Color
Instructions
- Roll Out the Dough: Begin by rolling out your cutout cookie dough to your desired thickness between two sheets of parchment paper. The parchment paper prevents sticking and makes cleanup a breeze.
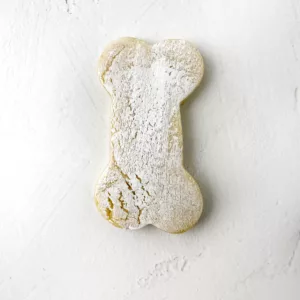
- Cut Out Shapes: Use your cookie cutter to press down into the rolled-out dough. Gently remove the bone shape and place it on a flat surface or directly on a cookie sheet. Repeat this process until you have the desired number of bone-shaped cookies.
- Prepare the Crackle Effect: For the enchanting white crackle effect, you'll need White Americolor Gel Food Color. Wet your paintbrush slightly and dip it into the gel color in the paint palette.
- Paint the Cookies: With the damp paintbrush, pick up the white gel color and apply it to the surface of the bone-shaped cookies. Be sure to cover the entire surface of each cookie with the color.
- Optional Chill: If desired, place the painted cookies in the fridge for about 10 minutes. This step helps set the gel color and prevents any smudging during baking.
- Bake and Cool: Bake your cookies according to your cutout cookie dough recipe. Once baked, remove them from the oven and allow them to cool to room temperature on a wire rack.
- Admire the Magic: Behold the mesmerizing white crackle effect that has transformed your cookies into edible works of art.
Notes
Pro Tips and Creative Variations
- Adaptable to Any Shape: While this tutorial features -shaped cookies, feel free to apply the crackle effect to other cookie shapes for a captivating twist.
- Delicate Dampness: When wetting your paintbrush, ensure it's only slightly damp, as excessive moisture may affect the texture of the cookie.