Explore the step by step guide to create delightful Christmas Charcuterie Cones, a playful twist inspired by the holiday snack boards and cups.
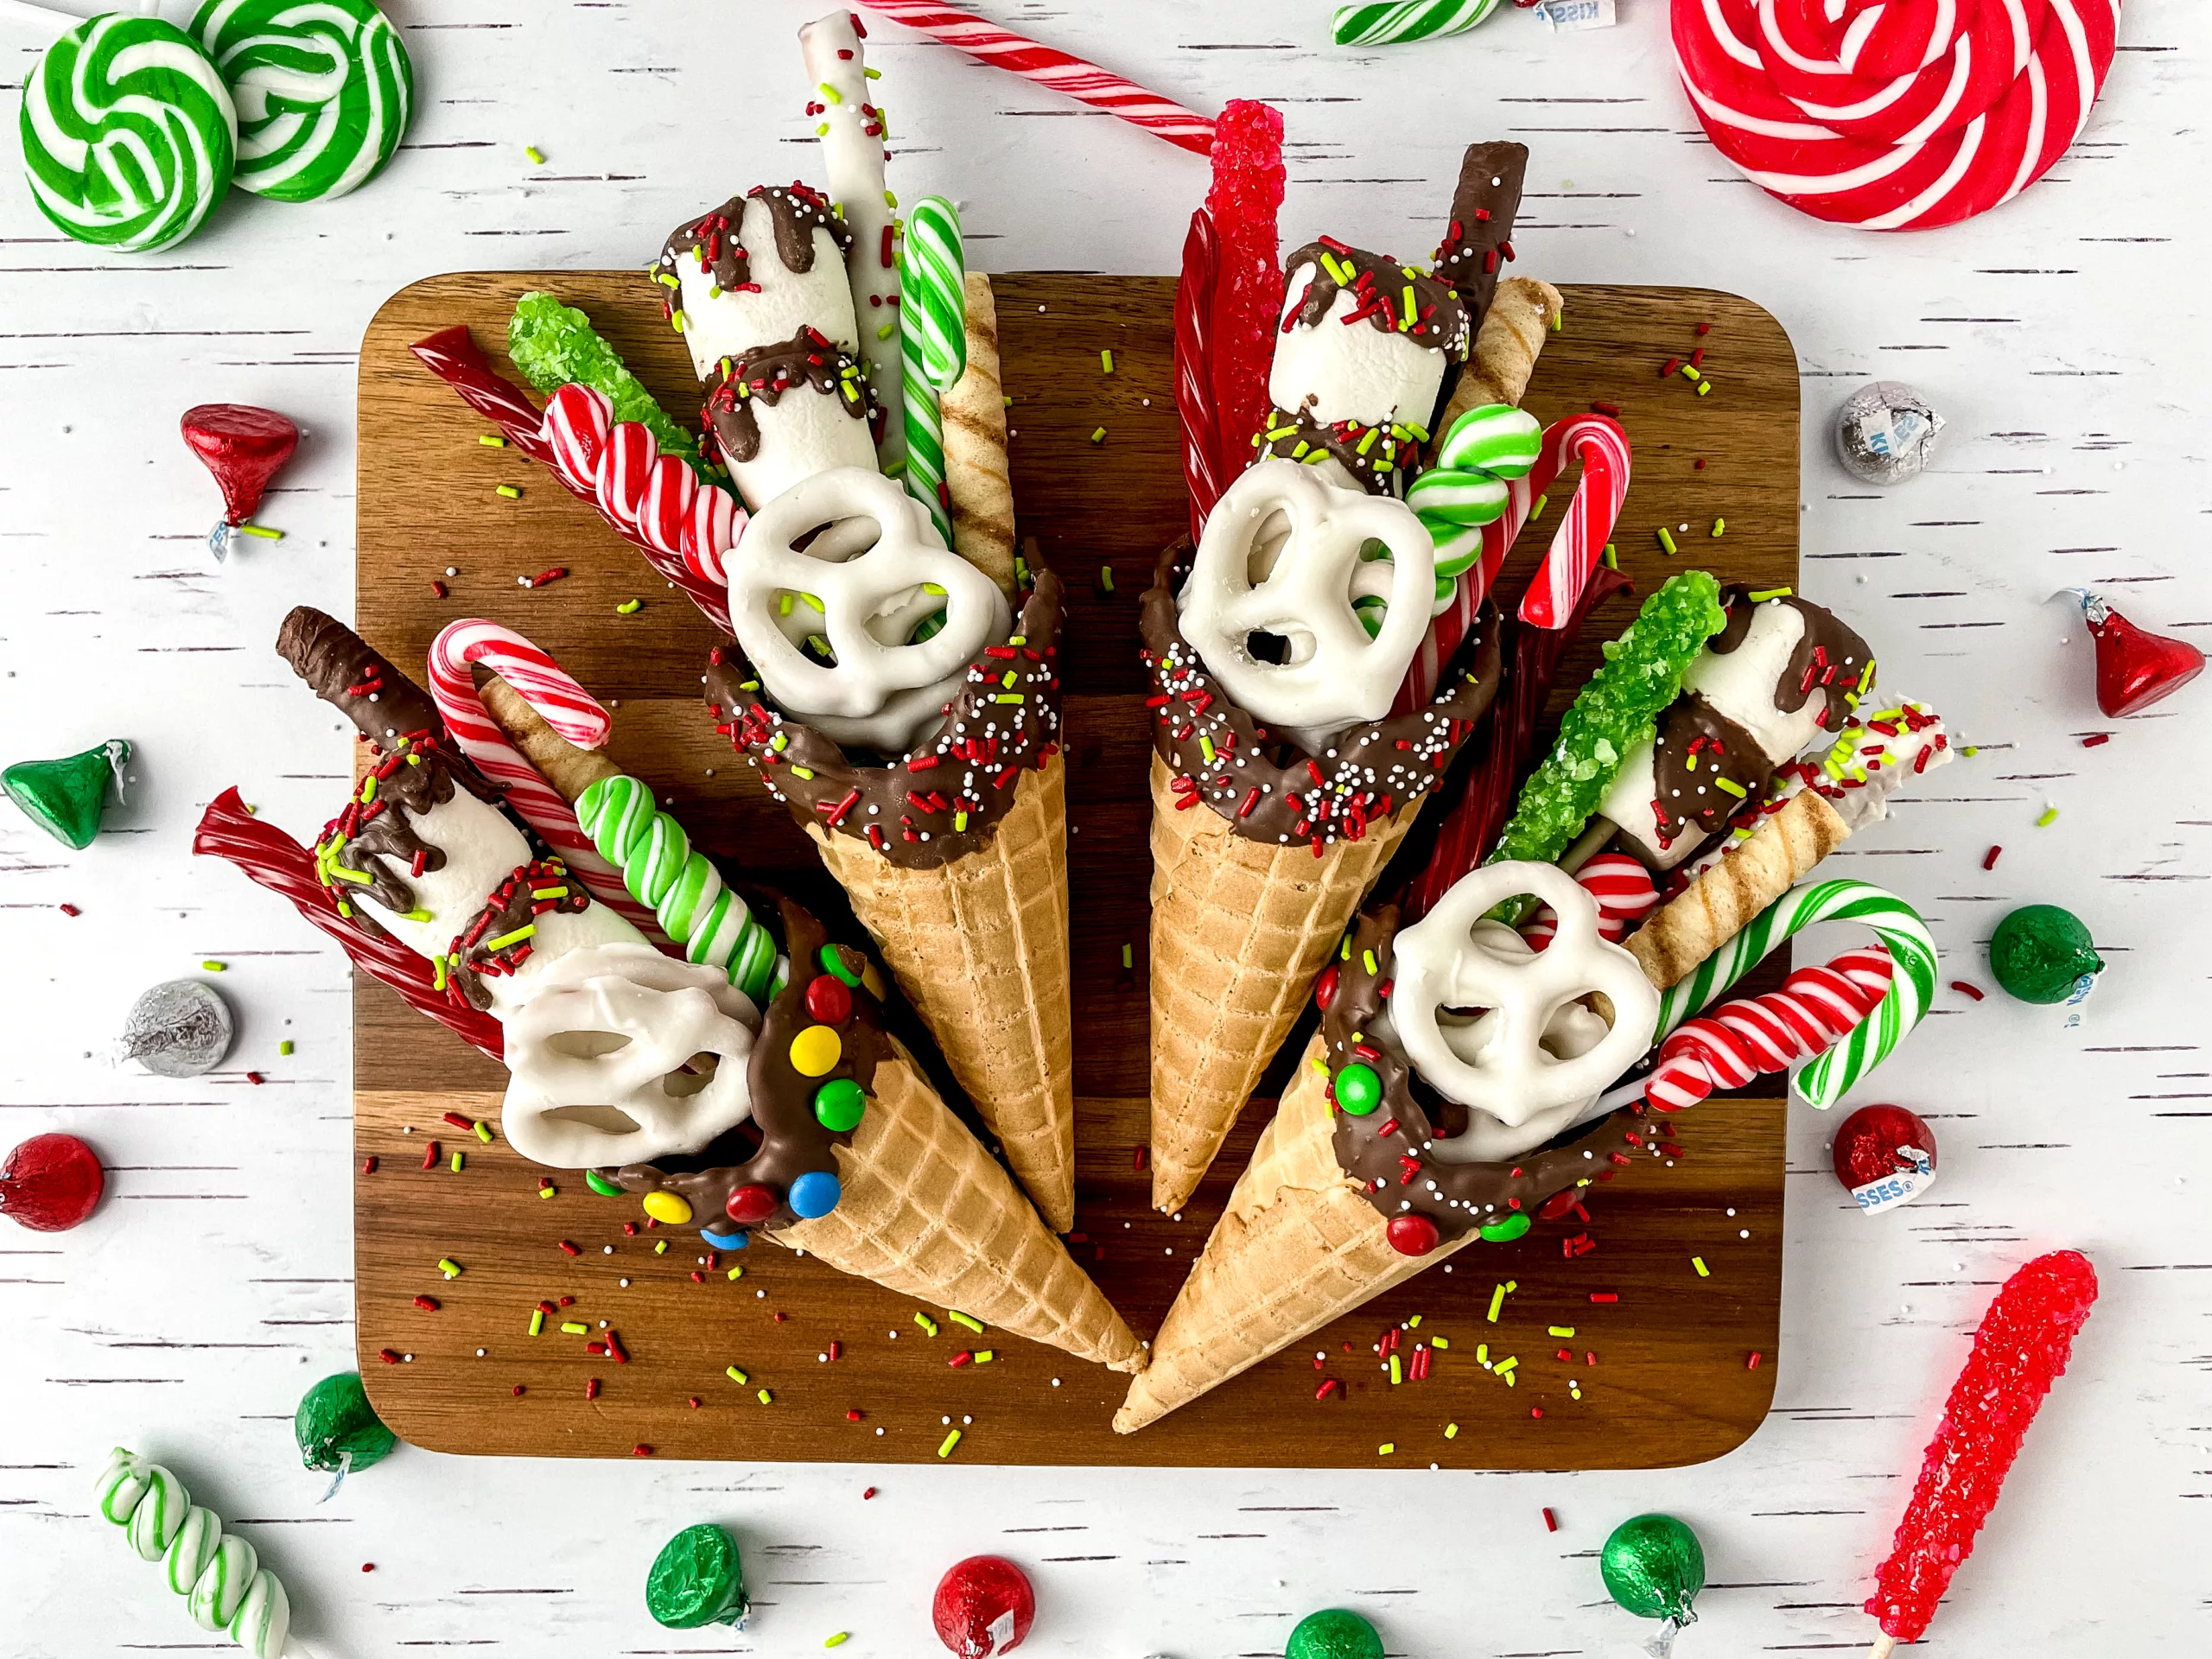
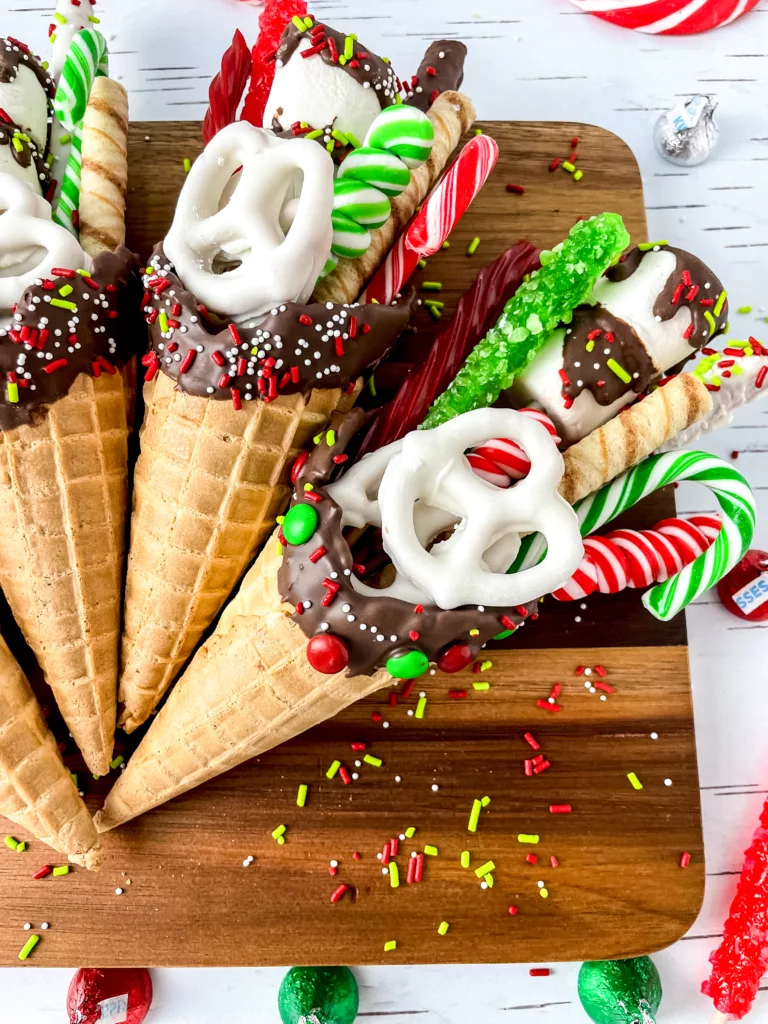
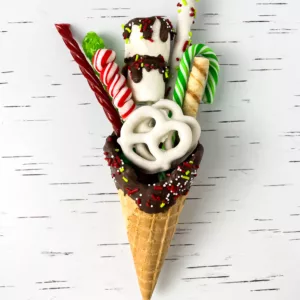
Celebrate the holiday season with my new charming creation Christmas Charcuterie Cones. They are delightfully inspired by festive Christmas charcuterie snack boards and cups. This imaginative blend of sweet treats that have vibrant colors and are full holiday spirit, bring a playful addition to any seasonal gathering. They’re made with a delicious assortment of candies, chocolates, and treats. These cones aim to please, both the taste buds and the eyes. So follow this step by step guide to bringing some coney Christmas cheer to your next gathering.

Equipment:
- Measuring Cups
- Piping Bag
- Small Microwave Safe Bowls
- Parchment Paper
- Scissors
Yield: 4 Cones
Timings:
- Prep time: 12 minutes
- Active time: 28 minutes
- Idle time: 10 minutes
- Total time: 38 minutes
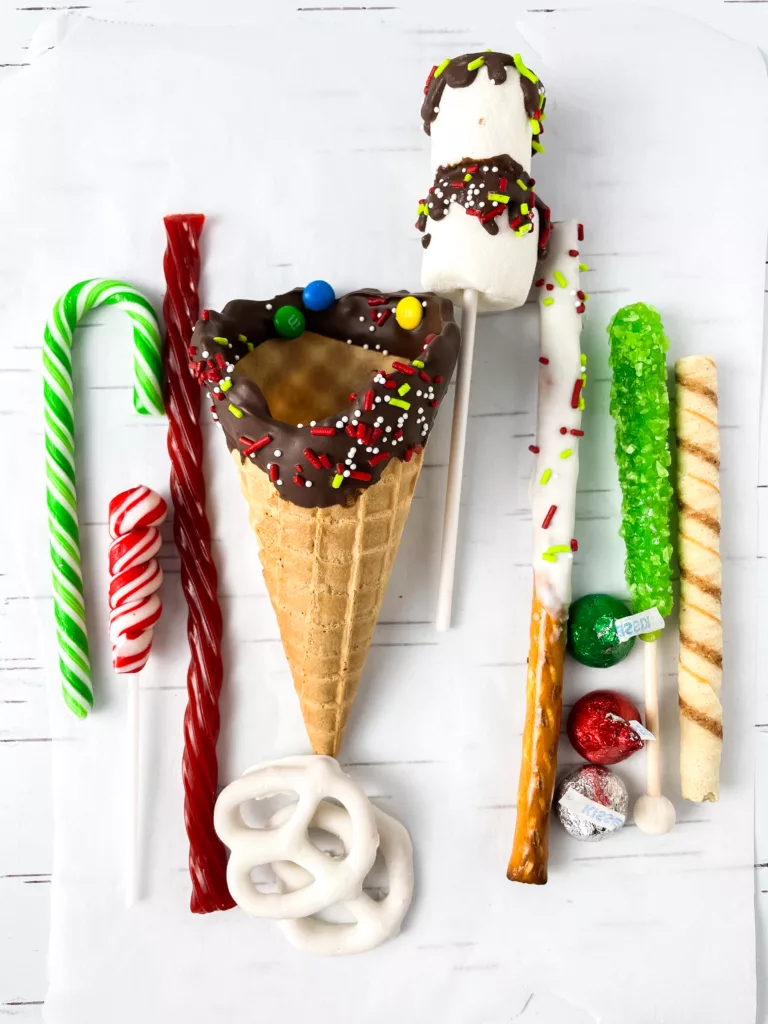
Ingredients:
- 4 Waffle Cones
- Green and Red Candy Canes
- Green Rock Candy
- Red Rock Candy
- Twisted Lollipops
- Pirouline Wafers
- Marshmallow Pops (refer to Charcuterie Cups Tutorial)
- Twizzlers
- Chocolate Pretzel Sticks
- Chocolate Pretzel Bows
- Christmas Sprinkles
- Brown Chocolate Melts
- Sprinkles
- Mini M&Ms
- Christmas Chocolate Kisses
Instructions:
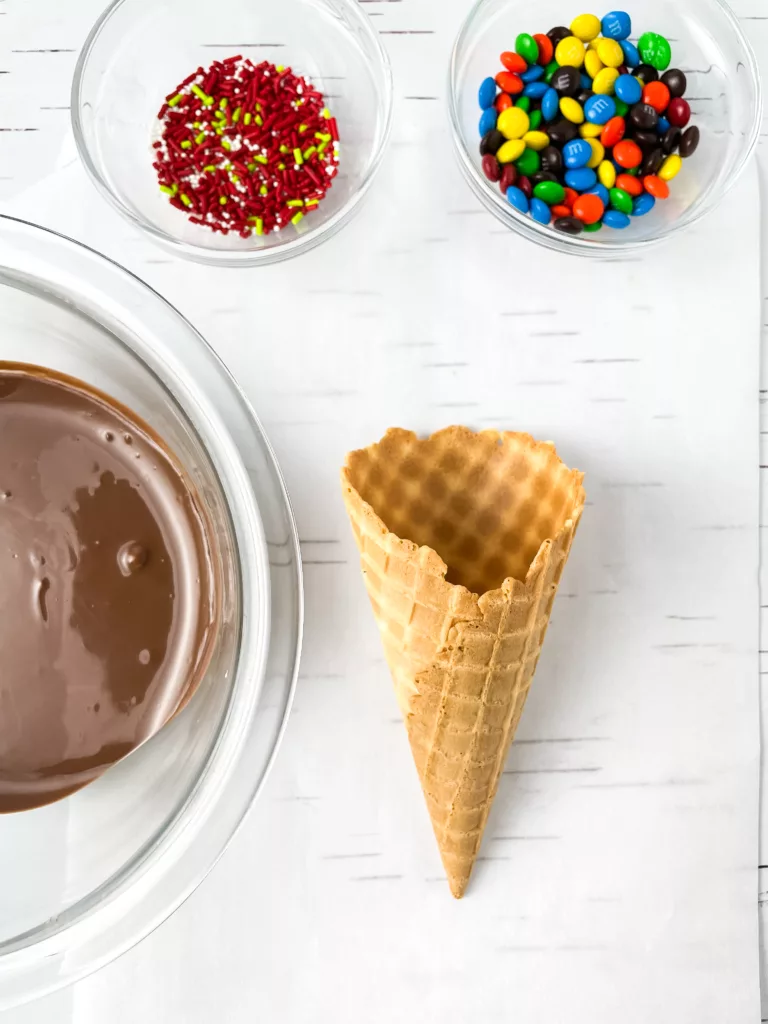
- Prepare Chocolate Coating:
- Place the chocolate melts in a microwave-safe bowl. Heat for 30 seconds, then stir. Continue heating in 15-second intervals until the chocolate is fully melted and smooth.
- Let the melted chocolate cool for about 10 seconds until it reaches a slightly thicker consistency.
- Lay out a sheet of parchment paper to place the cones on for assembly.
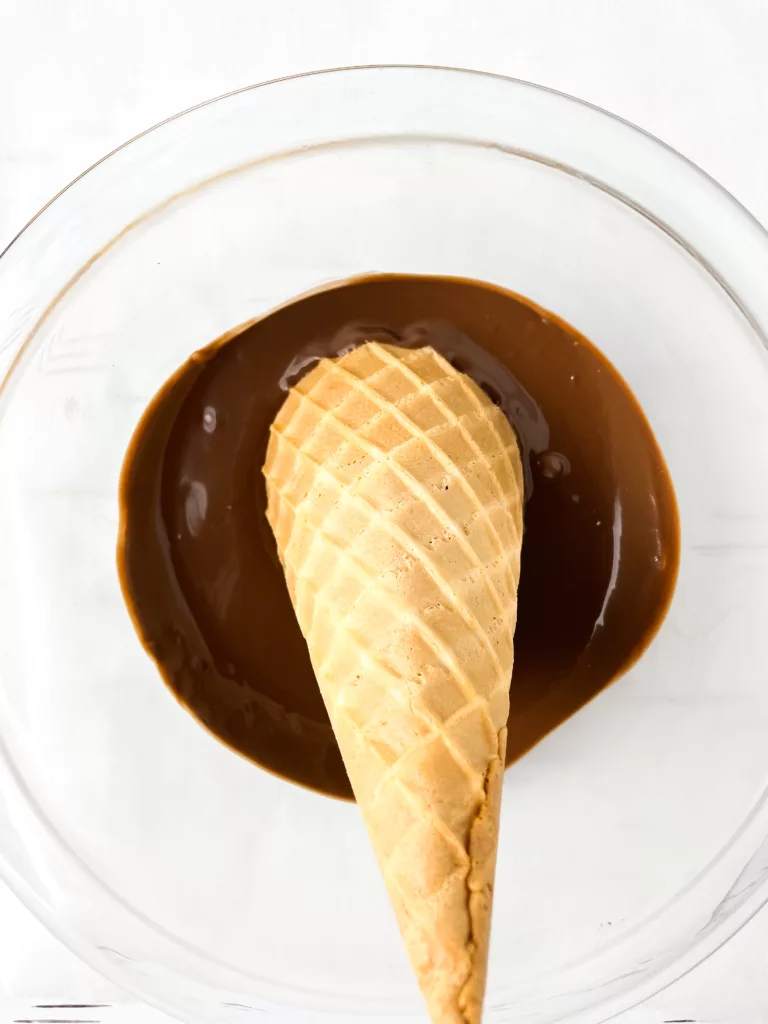
- Chocolate Coating the Cones:
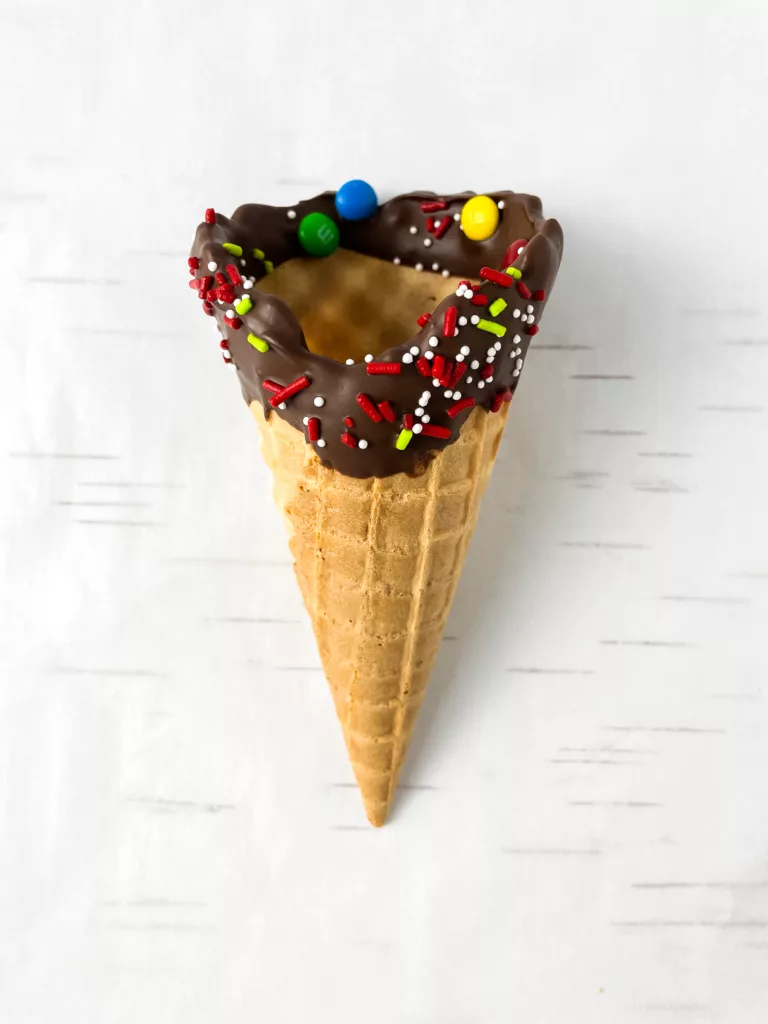
- Dip each waffle cone into the melted chocolate, ensuring to cover it well. Wipe off any excess chocolate by running the cone’s side along the edge of the bowl.
- While the chocolate is still wet, decorate by adding sprinkles or mini M&Ms as desired on the cone.
- Repeat this process for each cone and allow them to sit for 10 minutes to solidify.
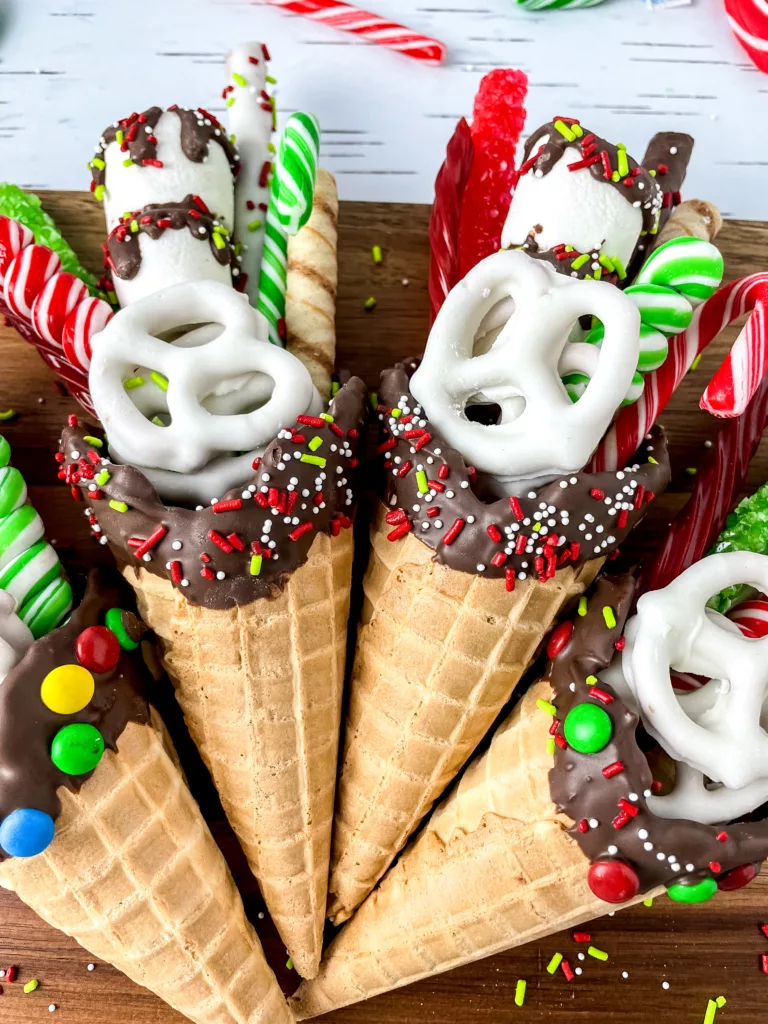
Assembling the Charcuterie Cones:
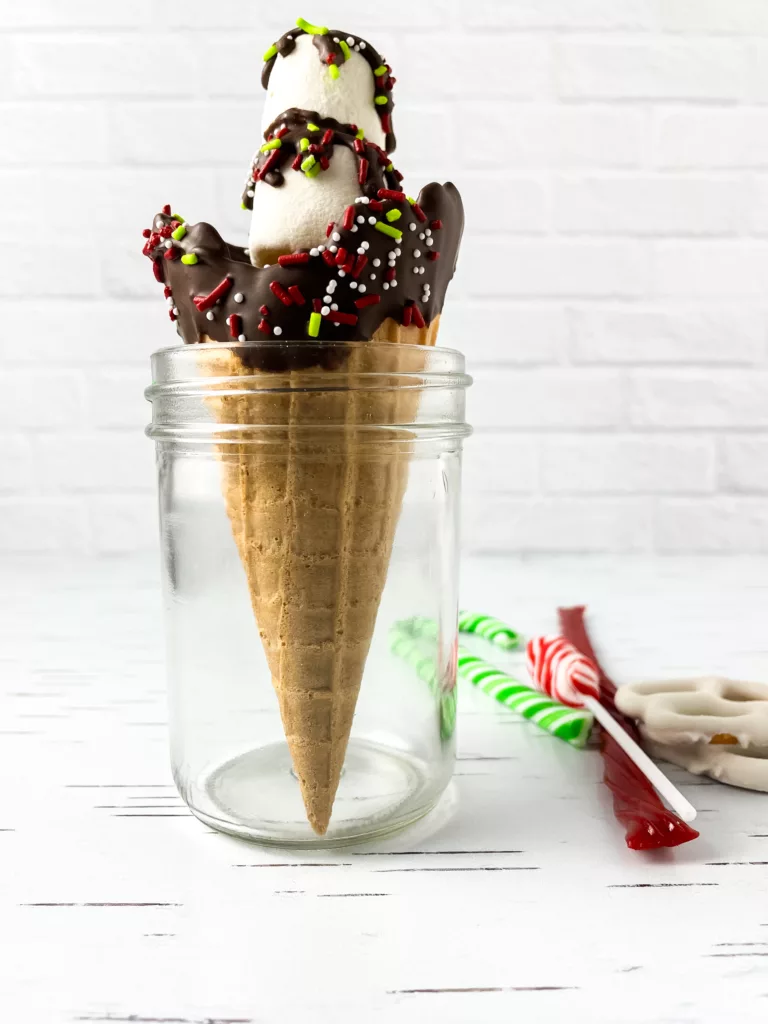
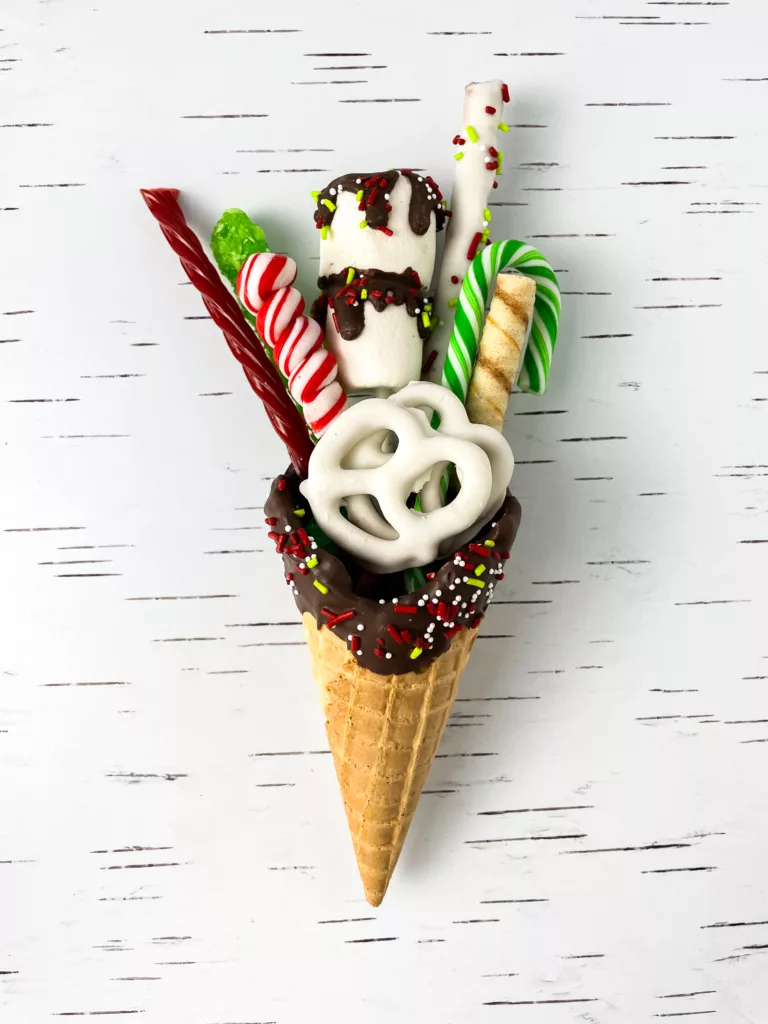
- If the cones will be served standing, assemble them in a tall glass or jar. If they’ll be served on a plate, assemble them while laying flat.
- Begin by placing three Christmas chocolate kisses at the bottom of each cone.
- Next, add the marshmallow pops, followed by the larger treats like chocolate pretzel sticks, Pirouline wafers, Twizzlers, and rock candy pops.
- Finally, add the twisted lollipops and chocolate pretzel bows to the front of each cone for a finishing touch.
- Display your beautifully assembled cones in a festive manner, ready to be enjoyed by all!
Variations:
- Savory Charcuterie Cones: If you prefer a more savory twist, consider filling the cones with a variety of cheeses, cold cuts, olives, and nuts. Add some fresh herbs for a pop of color and flavor.
- Hot Cocoa Cones: Fill the cones with hot cocoa mix, marshmallows, and mini chocolate chips. When ready to serve, pour hot milk over the contents for a warm and comforting treat.
- Nut-Free Cones: If you have nut allergies to consider, simply omit the nut-based treats and focus on nut-free chocolates, candies, and other confections to create a safe and delicious treat for all.
More Fun Ideas:
- Adults-Only Cones: For a more sophisticated twist or Adult themes, add gourmet chocolates, liqueur-filled chocolates, and candied nuts to your cones. These make for a delightful treat alongside a glass of wine or a cup of coffee.
- Seasonal Fruit Cones: For a healthier option, fill the cones with a mix of seasonal fruits like berries, sliced apples, and mandarin oranges. Add a dollop of yogurt or a drizzle of honey for a fresh and lighter treat.
- Customized Theme Cones: Tailor the cones to match a specific theme. For instance, create Halloween-themed cones with spooky candies or Valentine’s Day-themed cones with heart-shaped chocolates and red and pink treats.
- DIY Decorating Cones: Set up a decorating station where guests can create their own cones. Provide a variety of toppings and fillings, allowing everyone to personalize their cone to their liking.
FAQs:
Can I make these cones in advance?
- Absolutely! You can prepare the cones a day in advance and store them in an airtight container to maintain their freshness. However, if the cones contain any perishable items like marshmallow pops, it’s best to assemble those closer to the serving time.
What can I substitute for the listed candies and treats?
- Feel free to personalize your cones with your favorite holiday treats. You can use any candies, chocolates, or cookies that you and your guests enjoy. The possibilities are endless, so get creative!
Can I make these cones with a gluten-free or vegan twist?
- Yes, you can accommodate dietary preferences by selecting gluten-free cones, chocolates, and candies. For a vegan version, ensure that all the ingredients are vegan-friendly, such as dairy-free chocolate and gelatin-free marshmallows.
Can I use regular cones or other cone alternatives?
- Absolutely! If waffle cones are not available, you can use sugar cones or even make your own cones using rolled wafer cookies. Be mindful of their size to ensure they comfortably hold the treats.
How can I prevent the cones from becoming soggy?
To prevent the cones from becoming soggy due to the filling, consider coating the interior with a thin layer of melted chocolate or a sugar glaze. This creates a barrier between the cone and the fillings.
Storage and Transportation:
How long can I store these cones once assembled?
- Once assembled, it’s best to consume the cones within 1-2 days for the best taste and texture, especially if they contain perishable items. If the contents are non-perishable, they might last a bit longer, but freshness might diminish over time.
what’s the best way to transport these cones without messing up the decorations?
- To transport the cones without smudging the decorations, you can place each cone in an individual clear cellophane bag or wrap them in plastic wrap. This will help protect the treats during transportation.
More Festive Recipes:
Share and Enjoy!:
Enjoy the creative process of assembling these Christmas Charcuterie Cones and witness the joy they bring to your holiday celebrations! Whether as a delightful treat for gatherings, deliciously fun party favors, or personalized gifts, these cones offer a perfect way to spread cheer during the festive season. Experiment with various fillings and decorations to suit different tastes and themes, making your celebration even more special and memorable.
Enjoying the yummy recipes on my blog? Don’t forget to share, comment, and subscribe for more delicious content! If you recreate any of these tasty dishes, be sure to tag me @torriemadeit on all platforms, I wanna see your kitchen magic!
How to make Christmas Charcuterie Cones
Equipment
- Measuring Cups
- Small Microwave Safe Bowls
- Parchment Paper
- Piping Bag (optional)
Ingredients
- 4 Waffle Cones
- Green and Red Candy Canes
- Green Rock Candy
- Red Rock Candy
- Twisted Lollipops
- Pirouline Wafers
- Marshmallow Pops (chocolate dipped)
- Twizzlers
- Chocolate Pretzel Sticks
Instructions
- Prepare Chocolate Coating:
- Place the chocolate melts in a microwave-safe bowl. Heat for 30 seconds, then stir. Continue heating in 15-second intervals until the chocolate is fully melted and smooth.
- Let the melted chocolate cool for about 10 seconds until it reaches a slightly thicker consistency.
- Lay out a sheet of parchment paper to place the cones on for assembly.
- Chocolate Coating the Cones:
- Dip each waffle cone into the melted chocolate, ensuring to cover it well. Wipe off any excess chocolate by running the cone’s side along the edge of the bowl.
- While the chocolate is still wet, decorate by adding sprinkles or mini M&Ms as desired on the cone.
- Repeat this process for each cone and allow them to sit for 10 minutes to solidify.
- Assembling the Charcuterie Cones:
- If the cones will be served standing, assemble them in a tall glass or jar. If they’ll be served on a plate, assemble them while laying flat.
- Begin by placing three Christmas chocolate kisses at the bottom of each cone.
- Next, add the marshmallow pops, followed by the larger treats like chocolate pretzel sticks, Pirouline wafers, Twizzlers, and rock candy pops.
- Finally, add the twisted lollipops and chocolate pretzel bows to the front of each cone for a finishing touch.
- Presentation and Enjoyment:
- Display your beautifully assembled cones in a festive manner, ready to be enjoyed by all!
This post contains affiliate links. If you purchase from some of these links I will receive a small commission but it will Not add any additional cost to you.
2 Comments